Work with Vendor Information - Basics Version
Contents
Overview
People often shop for their households at stores that belong to a national chain. One
company may have several stores in the same city, and shoppers with a charge
card for the store may use their card at any location. Charge customers receive
an itemized bill which they may pay at one of the store's locations, or by
mail to the store's payment office, or online using their bank's automatic bill-paying feature. Indexer test.
Working with vendors has parallels.
First, you set up your vendors in the system by entering basic information. Next,
you identify the different "shopping" and "paying" locations
for each vendor:
- A vendor buy-from location accepts purchase orders. A vendor may
have one buy-from location, or several. You identify all the buy-from
locations that you plan to use for each vendor. For each of your vendors,
you record at least one buy-from location in the system.
For invoicing (and payment purposes), you must also identify vendors'
pay-to location(s) and invoicing locations.
- A vendor pay-to location accepts payments. Some vendors have multiple
buy-from locations, but only one pay-to location. Other vendors may have a
single buy-from location, which is also the pay-to location.
- A vendor's invoicing location sends you invoices, and may be different
from the vendor's pay-to location.
When you create a new vendor, you must designate the vendor type. The types are:
-
MM - Used in Materials Management. The vendor has only buy-from locations.
- AP - Used for Accounts Payable. The vendor only has AP locations.
- MM and AP - Used in both Materials Management and AP functions. The vendor has both buy-from and AP locations.
This topic explains how to add vendors to ERP manually. You can also import vendor data, which is covered in this topic: Import Vendor Data.
Note: A system setting, described below, lets you decide if you will enter vendor data manually, import vendor data, or do both. If your site is set up to import vendor data only,
you will not be able to change or create vendor records manually. See Import
Vendor Data for more information.
Using the Vendors List
The vendors list displays all vendors for your site. You can sort the list in various ways, and you can display suspended and non-suspended vendors.
To use the Vendors List:
- From
the main Materials Management or AP Contents, select Vendors > Vendors.
- On
the Quick Click menu, select "I
would like to ... View the Vendors List." Click Show
All. The list of vendors appears.
- To view a particular vendor, on the Quick Click menu, enter the Vendor
Name under Starting With and click Go. The
vendor list appears with the vendor you specified at the top.
- Click
the Help button to get information about columns in the list.
- Clicking
the small right arrow
 next to a Vendor Name takes you to the vendor's web site.
- Clicking the i icon next to a vendor opens the vendor inquiry panel, which displays the vendor record in read-only mode.
Select the Method for Adding Vendors in System Values
Below are instructions on how to add vendors to ERP manually. You can also import vendor data, which is covered in this topic: Import Vendor Data.
Users want to add vendors to ERP with both the import method, or manually, as they choose. A feature field Vendor Maintenance Mode is available for this purpose (Figure 1).

Figure 1 - Vendor Maintenance Mode: Select Method of Adding New Vendors
Before you add a vendor to ERP, check this field and set it as you wish.
- From the main Materials
Contents, select Administration > System Values. System values appear.
- Click Menu > Edit.
A tabbed panel appears.
- Select the Other tab.
- Click the drop down arrow and select the desired option:
- To always only enter new vendor records manually: select Manual Only.
- To always use the vendor import only for new vendors: select Import Only.
-To use either the import or manual entry, as you choose, at any time: select Manual and Import.
- Click Submit.
Set System Defaults and Requirements for Vendors
You can set system defaults for vendors and enter a Federal Tax ID for new vendor records. The system can also check for a duplicate Federal Tax ID in existing vendors when you create a new vendor record.
Defaults
Your site may have established default system values for buy-from location and AP location records. A flag on the Vendor Edit panel lets you specify that the defaults are to be used. When the vendor flag is set, the system populates the AP and/or buy-from location record with the defaults when a record is created, edited, or copied. The user cannot change the default values unless the system defaults are removed.
The fields that can contain defaults are:
- On the Vendor Buy-From Location Edit panel - Minimum Order Amount and Default Charge Type.
- On the AP Location Edit panel - Payment Terms, Discount Terms, and Payment Method.
A discussion is in the topic "Setting System Defaults for Vendor Records."
Flags for Requirements
On the System Values panel (Work in Administration > Administration > System Values > edit > Other tab), you may set a requirement that all new vendors have a Federal Tax ID. Additionally, you can instruct the system to check for a duplicate Federal Tax ID in existing vendors when you create a new vendor record. The System Values panel has fields for specifying these options.
The fields are:
- Federal Tax ID
- Duplicate Vendor Tax ID Validation.
Details are in the topic "System Values for Vendors."
Organizational Overrides
You can override vendor default values for any particular organization. The fields that you can override are:
Payment Priority
Default Distribution Profile
Default Distribution GL Account
Default Project Code
Default Fund Code
Separate Payments per Invoice
Hold Future Payments
Auto Match EDI Invoices
No Match -- Credit Account
1099 Code
See Overriding Vendor AP Locations by Organization.
Security
The User Profile field Allow Add/Update/Delete of Vendor Type "MM and AP" controls whether a user can create and maintain "MM and AP" type vendors. This field is located on the user profile Authorities tab. The field is set by default so that users can automatically add/delete/update vendors of this type.
When the field is checked,
-
A user creating a vendor can select the type "MM and AP" for the vendor.
-
The user can also update and delete vendors of this type.
When the field is not checked,
- The user can only create AP or MM type vendors.
- The user can view "MM and AP" vendor information, but cannot change the information or delete the vendor. On the vendor list, clicking the edit icon displays an inquiry panel for the vendor, which cannot be edited. However, information on the Restricted Orgs panel can be edited.
If the user tries to delete, undelete, suspend, or unsuspend an "MM and AP" vendor, an error message appears, and the action is not performed.
Role Objects for Users Who Work with Vendors
These role objects must have the appropriate settings in the Roles assigned to users who work with vendors. The minimum setting is View.
| Role Object Name |
Description |
| VendorAA |
Vendor Activity Analysis. The user can review vendor activity. |
| VendorApproval |
Vendor Approval. The user approves new vendors. On the person's User Profile, User Roles tab, the field User is Vendor Approver must be selected. Also, the notification Vendor Submit Notify Type field should be selected (Approver Limits tab).
For users who create vendors that are then routed to approval, the field Vendor Approval Notify Type (AP Limits tab) should be selected. |
| VendorApprovalAdmin |
Vendor Approval Administrator. The user can change vendor approval settings and user assignments. |
| Vendors |
Vendor setup and maintenance. When set to All or Create, the user can create new vendors. Other settings -- Modify, View, or None -- may be appropriate for other users who do not work with vendors. |
| VendorsAP |
AP Vendor setup and maintenance. The user can create and work with AP vendors only. |
| VendorsMM |
MM Vendor setup and maintenance. The user can create and work with MM vendors only. |
| VendorsMMandAP |
MM and AP Vendor setup and maintenance. The user can create and work with both AP and MM vendors. |
| Documents |
The user can work with vendor documents. See the subsequent discussion. |
| Item Vendor (Maintain Item Vendor) |
Prevents non-authorized users from creating vendors. |
The "Item Vendor" Role Object
Some medical centers wish to reserve the ability to create and edit vendor records only for central administrative staff. Users who maintain inventories at individual hospitals are not allowed to create vendors, nor edit vendor attributes, including item vendor records.
Creating and editing vendor information is controlled by the “ItemVendor” role object (and is no longer controlled by the “Inventory” role object).
- Users with the role object "ItemVendor" set to Modify, Create, or All can edit vendor records, and perform other actions, such as assigning the item to an inventory. (Create also allows creation of vendor records; All permits creating, editing, and deleting.)
- Setting the "ItemVendor" role object to View prevent users from any action excepting viewing vendor records. For these users, clicking Menu > Edit for an item vendor record acts as “inquiry:” changing the data is not possible.
The "Inventory" Role Object
Administrators wish to control the ability to edit the item vendor record and change the primary supplier; however, users will need to be able to edit the primary supplier’s default UOMs.
To meet this need, the "Inventory" role object has been changed slightly, as follows:
For items that are active, single sourced, and have multiple units of measure, a menu option Override Default UOMs for Primary Supplier is available. Anyone who has the "Inventory" role object settings Modify, Create, or All can use the menu option to change the primary supplier's default issue or the default purchase UOM. (Users with the settings View or None cannot use this menu option.)
User Access to Vendor Record Documents
The "Documents" role object controls access to vendor documents. The setting Create (or All) allows users to create and copy documents. The default setting is Create. Only users with the setting All can delete documents.
Setting Up Vendors' Staff as Users
Some sites may wish to give a vendor's users access to purchase orders for the vendor in the site's supply chain data. If you are the administrator responsible for this task, the steps are similar to setting up any other user, except that a Vendor Security Code must be created and included in the vendor record, and in the data profile assigned to the user. Instructions for this setup situation are in a separate topic: Setting Up Vendor Access to Supply Chain.
Adding Vendors
Users with the appropriate authorizations can add new vendors, vendor buy-from locations, and AP locations to ERP. Depending on your site's policies, you can require vendors added to the system to be approved before they can be used for purchasing and invoicing/payments. Whether a vendor needs approval is based on User Profile settings for staff who create vendors, or edit vendor records. Vendor approval is outlined in the topic Vendor Approval Processing.
The instructions below are generic, and do not use vendor approvals.
Note also that you can set system defaults and requirements for some vendor characteristics, such as the Minimum Order Amount and Payment Method, among others.
To add a vendor manually
A. Enter the vendor name and vendor type.
- From
the main Materials or AP Contents, select Vendors > Vendors.
- On
the Quick Click menu, next to Create a New Entry, click New.
The Add Vendor - Select Type panel appears (Figure 2).
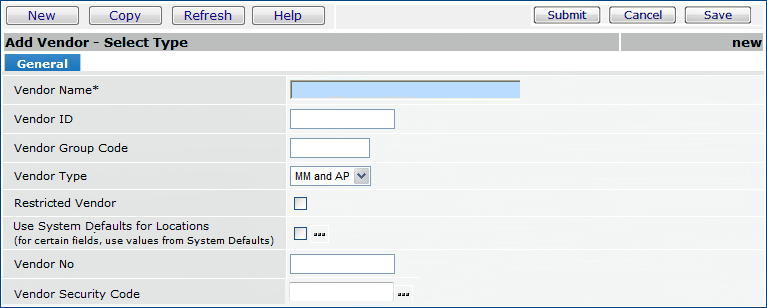
Figure 2 - Add Vendor - Select Type
- Enter information on the panel. You must enter
information in required fields (marked with * ).
- Restricted Vendor field: When checked, users
must be authorized to view information for the vendor. (A user's data
profile contains the authorization.) Information includes purchase orders,
invoices, and vendor records. (See Help.)
- If you select the field Use System Defaults for Locations, the vendor uses default values that you have established. For details on setting up and using vendor defaults, see System Defaults for Vendor Records.
- Vendor No field: This field will only be visible if manually setting the vendor number has been enabled through the Administration menu. It is an optional field; if you leave it blank, the system will generate a vendor number.
Note: The field in Administration > System Values that lets you assign your own vendor number is Manually Assign Vendor No. If you need to enter your own vendor numbers, talk to your system administrator about enabling this field.
- Click Help for a detailed description of the fields.
- Click Save.
If your System Values "check for duplicate vendors - warning or error" flag is set, and a duplicate vendor exists,
you get a warning message or an error message. The warning message lets you proceed to create the vendor. The error message will not let you proceed. At a minimum, you will have to change the Vendor ID to go further.
Details are in the topic "System Values for Vendors."
- Click Submit.
The entire Add Vendor panel appears (Figure 3).
Figure 3 - Add Vendor
B. Enter detailed information
Figure 3 shows the Buy-From Location panel for the creation of an MM and AP Vendor. However, the default view for the above panel will depend on the type of vendor you are creating. For new AP and MM & AP vendors, the AP Locations tab shows by default. For new MM Vendors, there is no AP Locations tab.
- Determine which of the tabbed panels you will need to complete, and collect
the information for the vendor. For example, if the vendor is a materials-only
vendor, you complete the Buy From Location and MM Information tabs, but not
the AP Location tab.
- Enter information in fields as needed on the tabbed panels. Be sure to specify the country in the address if it is not USA. You may enter up to 40 characters.
Note: Your site may have defined system defaults for fields on the Buy-From Location and AP Location panels. If defaults are defined, you cannot change them. Details are in System Defaults for Vendor Records.
Detailed explanations
of the fields are available by clicking Help. Some particular
fields of interest are:
- Buy-From Location panel: A field on the Buy-From Location Edit panel sets the buy-from location address to the AP location address so that you don't need to enter the same address twice. The field is: "Use AP Location Address."
Note: This feature is only available when creating new MM/AP vendors.
Instructions for using this field are below.
- Buy-From Location panel: PO Transmission Method - This field specifies
how you communicate purchase orders to the buy-from location: Normal (print/mail), EDI, Fax, Email.
- Buy From Location panel: Auto Process 856 Ship Notices
as Receipt - To process EDI 856 shipping notices, this field must
be set. Then, once a new 856 file is imported, the system will attempt to process
the 856 as a receipt. If this field is not set, EDI 856 shipping notices are
not processed as receipts, and appear on the Unprocessed Ship Notices Queue.
- Buy-From Location panel: When selected, the field Separate PO by
Department indicates that this vendor location requires a separate
PO for each department ordering items. Separate PO By Item Type, when
selected, indicates that this vendor location requires a separate PO for stock
items, and a separate PO containing non-stock and non-file items. See Separate
Purchase Orders and Direct Delivery.
Automatic Authorization of EDI, FAX, or Email purchase orders on the Buy-From Location panel
If you plan to use the auto-authorization feature for EDI, email, or FAX system-generated purchase
orders, you will need these fields:
- The PO Transmission Method must be EDI, FAX, or Email.
- Auto Authorize EDI POs, Auto Authorize FAX POs, or Auto Authorize Email POs. Select the appropriate field.
- Vendor Order Cycle: Auto-authorization works together with the Vendor Order Cycle.
Purchase orders for a buy-from location flagged as "auto authorize"
are automatically authorized according to the Vendor Order Cycle specified for the buy-from location. If you are using auto-authorization,
select a value in the Vendor Order Cycle field to authorize
POs according to a schedule. If do not specify a Vendor Order Cycle,
the system auto-authorizes the purchase orders as they are ready.
Your system administrator must schedule a job to run the auto-authorization process. The setup process for automatic authorization of FAX, email, and EDI purchase orders is in Auto-Authorize EDI, FAX, or email POs by Buy-From Location.
Note: Manually-created purchase orders cannot be auto-authorized.
- AP Information panel: Default Distribution Profile
- Click the AP Information tab. In the center of the tab
is the Default Distribution Profile field.
If you have defined a distribution profile in the
Accounts Payable tables, click the prompt and select the profile. For more information,
see Using
Distribution Profiles, which describes how to use a distribution profile
during invoice matching. Setting up charge
types and distribution profiles explains how to set up distribution profiles.
Notes: Before you can delete a distribution profile from the Distribution Profiles Table, you must first remove the profile from any vendor AP information panels that specify it.
- AP Location panel: Default Distribution GL Account - This field
is immediately below the default distribution profile on the AP Information
tab. This is the default account used for distributed charges (such as freight)
on purchase orders when no other account is specified.
- AP Location panel: Default Project Code and Default
Fund Code . These fields define the default project code and fund code for the vendor.
The project code and/or fund code on invoices for the vendor are set to these values automatically.
- AP Information panel: Payment Priority
- Payment Priority determines the order in which vendors are paid. If your
site uses payment profiles (which are set up in the system's tables), a payment
profile may contain a payment priority. Values are 1 through 9, or you can leave the field blank.
For imported invoices,
if the imported invoice's Payment Priority is zero, the system uses the vendor's default payment priority set in this field.
Otherwise, if the payment priority is greater than zero, the system uses the payment priority on the import.
- Form 1099 Information panel: Use this panel if the vendor provides goods
or services governed by 1099 commodity codes. Payments to vendors for 1099-coded
items or services must be reported to the IRS on Form 1099-MISC. The system
can generate information for this form. See Working
With 1099 Form Records.
- If your site requires a Federal Tax ID for all new vendors, and you have not entered one, when you click Save, an error appears. (This requirement is set in System Values.) Enter a value.
- When you are finished entering information for the vendor, click
Save. The system tells you if there are any errors.
- Correct your errors and click Save again.
- Click Submit
The system sends you a message that the vendor has been added.
C. Select Restricted Buy-From Locations and Restricted AP Locations
You can restrict buy-from location and AP locations for a vendor, if needed.
Note: You must have the appropriate security settings to complete this action. (See Security above.)
- To restrict a buy-from location, click the Restricted Buy Froms tab. A list panel opens, displaying a list of organizations.
- Locate the organization that you would like to restrict buy-from locations, and click Select Buy Froms.
- A panel appears, showing valid Buy From Locations from which you can select.
- To restrict AP Locations, click the Restricted AP Locations tab. A list of organizations appears.
- Click the Select AP Locations link to add an AP Location to the organization.
- A panel appears, showing valid AP Locations from which you can select.
- Click Save and then Submit to add the location.
D. Attach Documents to Vendor Records
You can attach documents to vendor records. When editing or performing an inquiry on a vendor record, you can add, view, or delete documents.
Documents Containing Electronic Protected Health Information (ePHI)
If you do not have ePHI access, and the "Contains ePHI Data" checkbox is selected, you cannot view a document. When you click the arrow to open the document, the Insufficient Authority message appears. For more information, see Securing Electronic Protected Health Information (ePHI).
To add a document:
- To add a document to the vendor, click the Documents tab.
- On the Vendor Documents panel, click New.
The Vendor Document Create panel appears (Figure 4).
- Enter a name in the Document Name field.
The name
displays on the Vendor Documents panel when the document is uploaded.
If you would like to add a document later, you may do so via the edit or inquiry panels. Find the vendor on the vendors list and click the  for the edit panel or the i for the inquiry panel. When the panel appears, click the Documents tab and follow the above procedure.
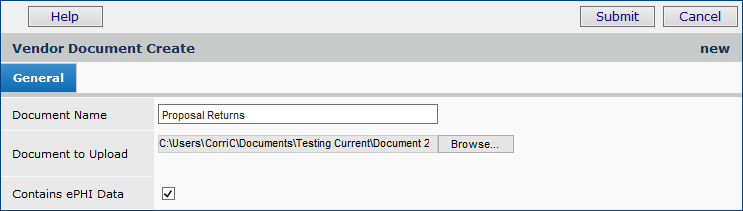
Figure 4 - The Vendor Document Create Panel
To view a document:
- On the Vendor List panel, locate the record of interest.
- Next to the record, click i for inquiry (or, if the record is available for editing, click the pen icon
 ).
).
- Click the Documents tab. The Vendor Documents panel appears (Figure 5).
A list of documents attached to the record is displayed, if any have been uploaded.
- To view a document, click the arrow next to the document.
The Microsoft Windows Download panel appears.
-
Click Open.
- You can attach a new document to a purchase order by clicking New (Figure 5, red box).

Figure 5 - The Vendor Documents Panel
To delete a document:
- Click Delete next to the document.
The system asks you to confirm the deletion.
- Click Delete.
To create a new MM/AP vendor with the same AP/buy-from location address:
- From
the Materials Management or AP main contents, select Vendors > Vendors.
- On
the Quick Click menu, next to Create a New Entry, click New.
The Add Vendor - Select Type panel appears (Figure 6).
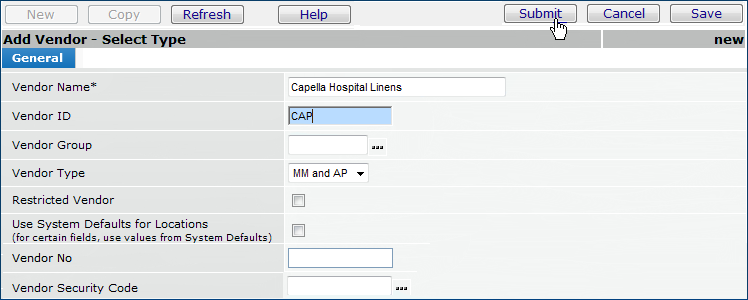
Figure 6 - Adding an MM and AP Vendor
- Enter information on the panel. You must enter
information in required fields (marked with * ).
- Click Submit. The entire Add Vendor panel appears, open to the AP Location tab (Figure 7).
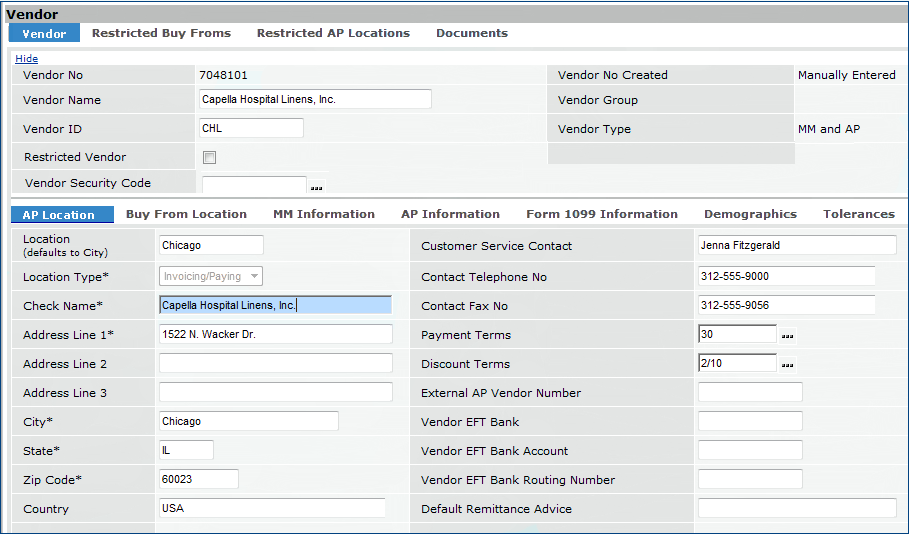
Figure 7 - The AP Location Edit Panel for a New MM/AP Vendor
- Enter information, including the address, for the vendor's AP location. Remember to specify the country if it is not USA. You may enter up to 40 characters.
- Click the Buy-From Location tab. The Buy-From Location panel appears (Figure 8).
Figure 8 - The Buy-From Location Edit Panel for a New MM/AP Vendor
The field Use AP Location Address is selected by default. When selected, the same address is used for the buy-from location as for the AP location.
- Click Save. The address fields on the Buy-From Location panel are populated by the system.
- Enter information on other fields and tabbed panels as needed.
- Click Submit.
If no approvals are needed, the vendor is created. If the vendor must be approved before it can be used in purchases, the vendor is displayed on the Vendors list, and the Status column displays the current approval state: Pending Approval. See Monitor the Progress of a Vendor Through Approvals.
- To use a different address for the buy-from location, be sure to uncheck the field Use AP Location Address. Then, enter the address information on the Buy-From Location panel.
- If you enter address information on the Buy-From Location panel, and the field Use AP Location Address is still checked, an error message appears (Figure 9).
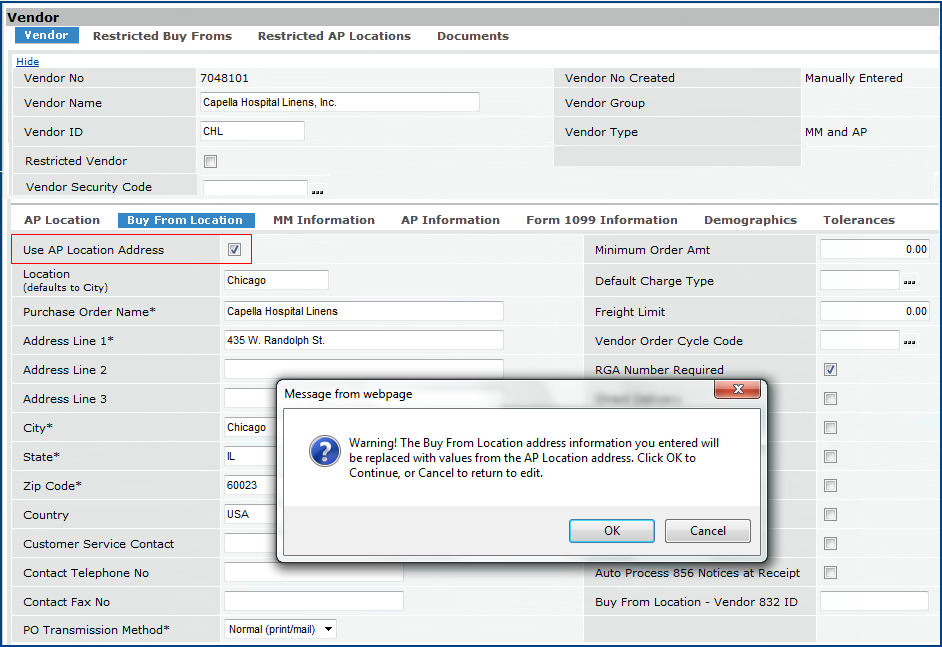
Figure 9 - Entering a Buy-From Location Address when Use AP Location Address is Checked
- Clicking OK accepts the AP Location address information that you entered and overwrites the Buy-From Location address. Both addresses are the same.
- Click Cancel to return to the edit panel. You can uncheck the field Use AP Location Address to keep the buy-from location address that you entered.
Adding Buy-From Locations
A single vendor may have several buy-from locations that can supply your hospital.
When you set up a vendor, a default buy-from
location record is automatically created. You can add more buy-from locations and change the default
to one of them. The system retrieves the default buy-from location and enters
it on POs, but you can edit a PO to specify another buy-from location if you
wish.
For each buy-from location, enter tax information used for purchase orders
sent to the buy-from location. See "To
enter tax data for a vendor buy-from location." If you enable taxes
for Materials Management, the system will enter the estimated taxes on purchase
orders.
See "Enabling
sales taxes for materials management."
Your site may have defined default values for one or both of the fields Minimum Order Amount and Default Charge Type. If defaults are established, these fields are populated, the values are grayed out, and you cannot change them. See System Defaults for Vendor Records for details on setting system defaults.
Note: In creating a record for a new vendor that is
both an MM and AP vendor, set up the invoicing/paying
location first, before setting up a buy-from location.
To
add a buy-from location:
- From the main Materials or AP Contents, select
Vendors > Vendors.
- On the Quick Click menu, under "I would
like to..." select Buy From Locations. (You can also select
Buy From Locations from the Menu next to a vendor on the Vendor
List.)
- Enter the Vendor Name in the box under
For... and click Go.
Vendor information appears.
- Click New. The Buy-From Location panel
appears.
- Insert information in the header panel, and
the tabbed fields as needed.
- Reminders: Fields marked
with * are required. You must specify the country (up to 40 characters) if it is not USA.
- Click Help for
field information.
- Click Submit.
A pop-up window appears telling you the Buy-from Location was added.
- Click OK.
To view buy-from locations
for a vendor and add information about a buy-from location:
You can view Vendor Buy-From Locations two ways:
- In the AP or Materials Management menu, click Vendors > Vendor Locations. The Vendor Locations panel has two tabs: Buy-From Locations and AP Locations. By default, Buy-From Locations are displayed.
- To search for a particular vendor, click the Search link at the top of the panel. A Search panel appears. You can do a full text search for the Vendor Number, AP Buy From Location, Address Name, or Address Line 1. You can search by Contact Telephone # or Contact Fax No. using numeric values only. (See Figure 10.)
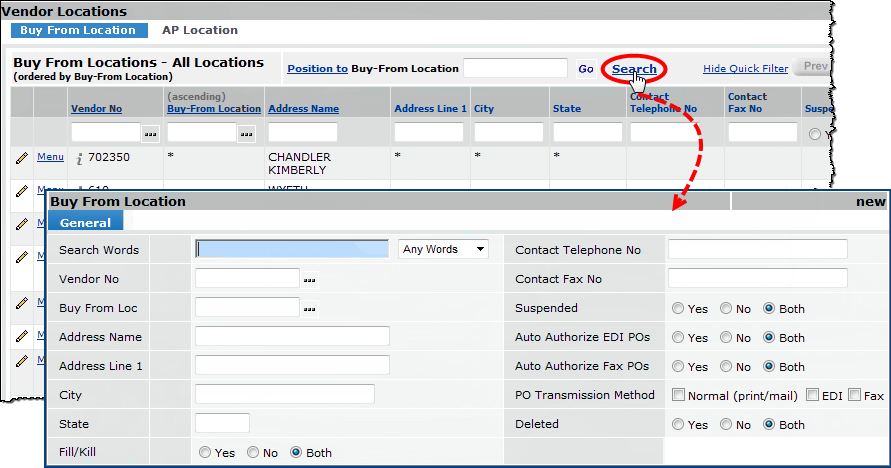
Figure 10 - Search for a Vendor Buy-From Location
- From the Vendors list, follow steps 1 through 3 in the procedure "To
add a buy-from location."
To enter information for a buy-from location or view statistics, follow these steps:
- Next to any buy-from location on the list, click Menu.
A drop down menu appears, from which you can select the following:
- Representatives - Contact information for buy-from location
staff who handle your hospital's orders.
- Buyers - Buyers for each organization at your site assigned
to the vendor buy-from location.
- Asset Location Accounts - Vendor buy-from location accounts
for your asset locations.
- Department Accounts - Vendor buy-from location accounts for
departments at your site.
- View Statistics - Statistics, such as the number of POs sent
to the buy-from location, the number of lines and dollars ordered, etc.
- Purchase Orders - Purchase orders sent to the buy-from location.
- Sales Tax - Sales tax rates and accounts, if the buy-from location
assesses taxes. The rates are used to estimate taxes on POs.
- Suspend - Suspends the buy-from location.
- Unsuspend - Unsuspends the buy-from location.
- Delete - Deletes the buy-from location
- Edit - Edits the buy-from location record.
- Copy - Copies the buy-from location..
The same menu options are available on the AP Locations tab of the Vendor Locations panel.
Copying an Existing Vendor to Set Up a New Vendor
On the Vendors list, clicking Menu or the edit icon next to the vendor number (Vendor
No) lets you copy or edit a vendor record. One useful strategy in setting up
new vendors who share some information is to copy vendor records, and then edit
the records to change information that is different.
To
edit or copy a vendor:
- From
the Materials Management or Accounts Payable main Contents, select Vendors > Vendors.
- Locate vendor that you wish to copy (or edit)
and select Menu > Copy (or Menu > Edit).
(You can use the Quick Click menu to display a vendor in the Vendor List.)
The vendor header information
appears. You can change information in the header, if you wish. The fields
are: Vendor Name, Vendor ID, Vendor Group, and Vendor
Type.
- Click Save.
- Click Submit.
The vendor detail tabbed panel appears. Add or change information on this
panel as needed. (Click Help for field descriptions.)
- When you are finished
editing vendor details, click Save. The system tells you if there are
errors.
- Correct the errors (if
any) and click Submit.
The copy is made. If you have edited or added information, the system
makes those changes.
Adding
AP Locations
An AP location is like the payment office mentioned in the chain-store example
above. A vendor may have one or more AP locations that handle the vendor's accounts.
If you send payments to a vendor's AP location, you need to add the AP location
data to the system.
For each AP location, enter tax information for the AP location's invoices.
See "To
enter tax data for a vendor AP location." If you enable Accounts Payable
for taxes, the system will calculate the taxes on invoices and distribute the
amounts to your designated accounts.
See "Enabling taxes for accounts payable."
Your site may have defined default values for the fields Discount Terms, Payment Terms, and, if used at your site, Payment Method. If defaults are established, these fields are populated, the values are grayed out, and you cannot change them. See System Defaults for Vendor Records for details on setting system defaults.
To
add an AP location:
- From the Materials Management or AP main Contents, select Vendors > Vendors.
The Quick Click menu appears.
- On the Quick Click menu, under "I would like to..." select
AP Locations.
(You can also select AP Locations from the
Menu next to a vendor on the Vendors list.)
- Enter the Vendor Name in the box and click Go.
Vendor information appears.
- Click New. The AP Location edit panel appears.
- Insert information in the tabbed fields as needed.
- Reminders: Fields marked with *are required. You must specify the country (up to 40 characters) if it is not USA.
- Click Help for field information.
- Fields of particular interest on the Main tab:
- Payment Terms - Payment terms are defined in your site's AP Tables.
Use this field to associate a set of payment terms with this vendor's AP
Location.
- Discount Terms - Discount terms are also defined in the AP Tables
for your site. Once defined, the terms can be associated with a vendor using
this field. Click the prompt to select discount terms.
- EFT fields - EFT Location (specifies that the AP Location uses
EFT for payments); Vendor EFT Bank, Vendor EFT Bank Account,
and Vendor EFT Bank Account Routing Number. For an EFT vendor,
you must also use a Payment Profile.
You set up your banking information in the payment profile. When you run
payments for the vendor, you specify the payment profile name that you are
using.
- Note: The Payment Method field appears if Integrated Payments is enabled for your site by Customer Support. Otherwise, you will not see this field. Integrated Payments is a tool for sites whose bank requires consolidated payments. See Creating Payment Exports for a Bank's Integrated Payments System for details.
- Fields on the Tolerances tab:
Tolerances are a subject in themselves, since there are a couple of ways
that you can set them. In brief, a tolerance defines limits on dollar differences
between invoices and purchase orders. For a full discussion of tolerances,
and how to enter fields on this tab, see Setting Tolerances for Invoice
Matching.
- Fields on the AP locations tab
- Click Submit.
A pop-up window appears telling you the AP Location was added.
- Click OK.
Updating an AP Location Address
When you change the address of a vendor AP Location, the system automatically updates the paying location address in any existing matched, approved, and unpaid invoices. Invoices with the Invoice Status Incomplete, Exception, Entered, Completed, Matched, Approved, and Partially Paid are updated. Recurring invoice addresses are also updated.
You can still import invoices with the old AP Location address and the import records will not get changed. However, the invoice generated from the import will be changed. Similarly, EDI 810 invoice records will not be changed; but an invoice created from the EDI 810 record will be changed.
To
view AP locations for a vendor:
- Follow steps 1 through 3 in the procedure "To add an AP location."
- To enter information for an AP location, or view statistics,
- Next to any AP location on the list, click Menu.
- A drop menu appears, from which you can select the following:
View Vendor Balances - Displays the current balance amount
for each organization that uses the AP location. Also, drills down to AP transactions.
Suspend - Suspends the AP location.
Unsuspend - Unsuspends the AP location.
Delete - Deletes the AP location
Edit - Edits the AP location record.
Copy - Copies the AP location.
more...
Setting
up vendor accounts
For each of a vendor's buy-from locations, enter accounts for the asset locations
that order items. You may also need to enter the account numbers of departments
that order directly from each buy-from location.
To set up a vendor account for an asset location:
- From the main Materials or AP Contents, select Vendors > Vendors.
- On the Quick Click menu, under "I would
like to..." select Buy From Locations. (You can also select Buy From Locations from the Menu next to a vendor on the Vendor
List.)
- Enter the Vendor Name in the box under For... and click Go.
The Buy From Location list appears. Locate the buy-from location of interest.
- Click the edit icon. The buy-from location record opens.
- Click the tab Asset Location Hospital Account.
If any accounts already exist for asset locations (or departments, if you are working with those) at the buy-from location, a list appears. Otherwise, you see No Data.
 If an asset location has an account number specified
for a vendor buy-from location, the system uses the account number on EDI transactions.
If an asset location has an account number specified
for a vendor buy-from location, the system uses the account number on EDI transactions.
An additional account number can be entered on the EDI setup panels as an
alternate customer identifier or to indicate a particular ship-to location.
Figure 11 is an example for asset locations.

Figure 11 - Asset Location Account Information for a Vendor Buy-From Location
-
Click New.
The edit panel appears (Figure 12).
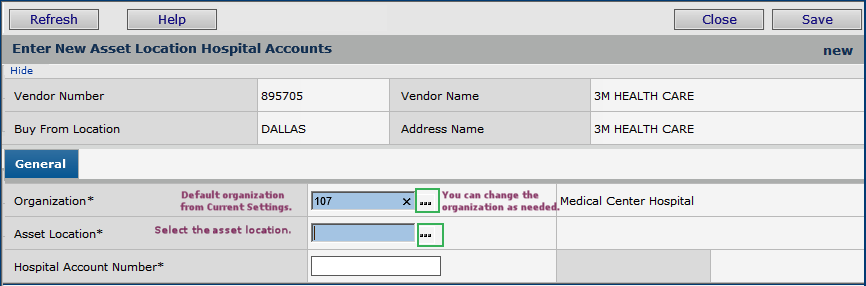
Figure 12 - The New Asset Location Panel
The Organization field initially defaults from your current settings, but you can click the ellipse (...) to change it.
- Change the Organization, if needed. It is a required field.
- Select the Asset Location and enter the Hospital Account Number. Both fields are required.
- Click Save (or Enter). The system tells you if there are errors. Correct the errors. The new account is saved.
The page remains open with the latest Organization and Asset Location values entered (sticky fields).
You can edit either field for the next account, and enter a new Hospital Account Number.
This process allows you to enter multiple hospital account numbers for different organizations and asset locations, without having to keep clicking New from the list.
- When you finish entering account numbers, click X in the upper right, or click Close.
ERP returns to the Asset Location Hospital Accounts list.
- Click Refresh to display the new accounts on the list.
To set up a vendor account for a department:
- From the main Materials or AP Contents, select
Vendors > Vendors.
- On the Quick Click menu, under "I would
like to..." select Buy From Locations. (You can also select
Buy From Locations from the Menu next to a vendor on the Vendor
List.)
- Enter the Vendor Name in the box under
For... and click Go.
The Buy From Location record list appears. Locate the buy-from location of interest.
- Click the edit icon. The buy-from location record opens.
- Click the tab Department Hospital Account.
If any accounts already exist for departments at the buy-from location, a list appears. Otherwise, you see No Data.
If a department has an account number specified
for a vendor buy-from location, the system uses the account number on EDI transactions.
An additional account number can be entered on the EDI setup panels as an
alternate customer identified
or to indicate a particular ship-to location.
- Click New.
The edit panel appears (Figure 13).
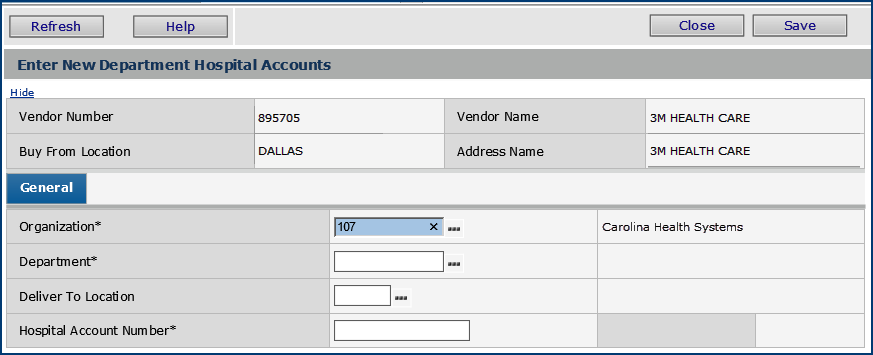
Figure 13 - Add a Department Account for a Vendor Buy-From Location
- Change the Organization, if needed. It is a required field. (Initially, the Organization defaults from your Current Settings.)
- Select the Department and enter the Hospital Account Number. Both fields are required. The Deliver To Location field is optional.
- Click Save, or press Enter. The new account is saved.
The page remains open with the latest Organization and Department values entered (sticky fields).
You can edit either field for the next account, and enter a new Hospital Account Number.
This process allows you to enter multiple hospital account numbers for different organizations and departments, without having to keep clicking New from the list.
- When you finish entering account numbers, click X in the upper right, or click Close.
ERP returns to the Department Hospital Accounts list.
- Click Refresh to display the new accounts on the list.
Viewing a vendor's items
You can view the list of
items that are established for a vendor in the the system catalog.
To
view a vendor's items:
- From the main Materials or AP Contents, select
Vendors > Vendors.
- On the Quick Click menu, under "I would
like to..." select View Items. (You can also select
View Items from the Menu next to a vendor on the Vendor List.)
- Enter the Vendor Name in the box under
For... and click Go.
A list of items available
from the vendor appears (Figure 14). The buy from location for each item is also
shown on the list.
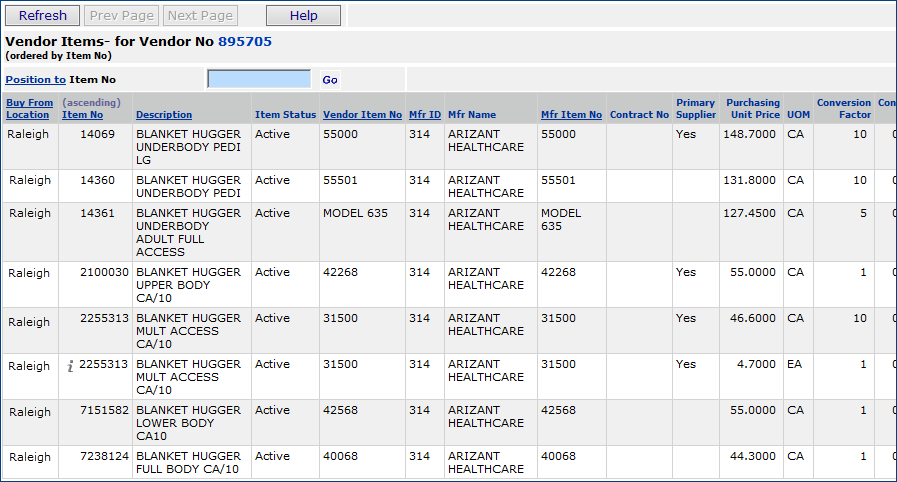
Figure 14 - A Vendor's Item List
Displaying/Editing Vendor Item Details
Creating and editing item vendor information is controlled by the “ItemVendor” role object.
To display/edit items' information for a vendor,
- From the Materials Management main contents, follow one of these paths to access the item inventory list:
- Inventory > Item Inventory or Item Inventory - All Locations.
- Inventory > Item Catalog > Menu > Item Inventory.
- Inventory > Item Catalog > Menu > Item Inventory - All Loc.
The Item Inventory list appears.
- Locate the item in list and click Menu.
The list of item vendors appears.
- Locate the item vendor of interest.
- Click Menu.
- For users with the “ItemVendor” role object set to View,
These menu options are not visible: Set Primary Supplier, Change MIN for same VINS, Assign To My Inventories, and Change MIN for same VINs, Mass Assign to My Inventories, Copy, and Delete.
Clicking Menu > Edit opens a view-only version of the edit panel. Users with the new role object set to View cannot change the values on the panel (Figure 15).
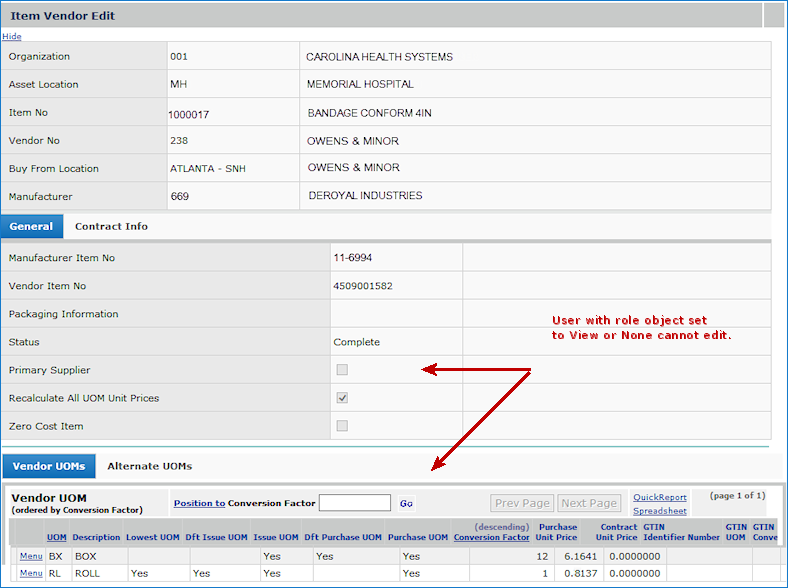
Figure 15 - Item Vendor Edit Panel – Users with “ItemVendor” Set to View, None Cannot Edit
Users with Modify, Create, or All can change the values on the Item Vendor Edit panel.
Suspending/Unsuspending
Buy-From Locations, AP Locations, and Vendors
From time to time, you may need to suspend ordering activity with a buy-from
location or suspend invoicing/paying activities with an AP location. A buy-from
location or an AP location can be suspended by itself, without suspending the
entire vendor. However, situations may come up when you do need to
suspend activity with an entire vendor. In this case, if the vendor is suspended,
all of its buy-from locations/AP locations are automatically suspended.
A vendor and a buy-from location cannot be suspended
if any open purchase orders exist for the vendor. If a new buy-from location is added to a suspended vendor, it will be added in a suspended
state.
Note: You can create a PO invoice for a suspended AP location if the buy-from location for the PO is not suspended. You cannot create a manual invoice for the suspended AP location, however.
When a suspended vendor is reinstated, the vendor's
buy-from locations and AP locations are not automatically reinstated as well.
They must be reinstated individually.
To suspend / unsuspend a vendor:
- From the main Materials or AP Contents, select
Vendors > Vendors.
The Quick Click menu appears.
- Under "I would
like to..." click Suspend (or Unsuspend) and enter
the Vendor Name. Click Go.
The system sends you a message asking
if you are sure that you want to suspend (unsuspend) the vendor.
- Click Submit.
The Vendor is suspended (unsuspended). When
a Vendor is suspended, Yes appears in the Suspended column on
the Vendor List, and the date and time appear in the Suspended Date column.
When the Vendor is unsuspended, Yes disappears and the Suspended
column is cleared. The date and time are also cleared from the Suspended
Date column.
To
suspend / unsuspend a buy-from location:
- Follow steps 1 through 3 in the procedure: "To
add a buy-from location."
- Next to the buy-from
location name, select Menu > Suspend (or Unsuspend).
The system sends you a message asking if you are sure that you want to suspend
(unsuspend) the buy-from location. (If the buy-from location that you want
to suspend has open purchase orders, you may not suspend it.)
- Click Submit.
The location is suspended (unsuspended).
When the location is suspended, Yes appears in the Suspended
column on the Buy-From Location list, and the date and time appear in the
Suspended Date column. When the location is unsuspended, Yes
disappears and the Suspended column is cleared. The date and time
are also cleared from the Suspended Date column.
To
suspend / unsuspend an AP location:
- Follow steps 1 through 3 in the procedure: "To
add an AP location."
- Next to the AP location
name, select Menu > Suspend (or Unsuspend).
The system sends you a message asking if you are sure that you want to suspend
(unsuspend) the AP location.
- Click Submit.
The location is suspended (unsuspended).
When
the location is suspended, Yes appears in the Suspended column
on the AP Location List, and the date and time appear in the Suspended
Date column.
When the location is unsuspended, Yes disappears and the Suspended
column is cleared. The date and time are also cleared from the Suspended
Date column.
Deleting/Reinstating
Buy-From Locations, AP Locations, or Vendors
You can "logically" delete a vendor using the Vendor menu in the system.
The deleted vendor remains in your database, but does not appear in any of the
vendor lists. You can also reinstate deleted vendors.
A vendor's buy-from locations and AP locations can be deleted separately from
the vendor itself. If the vendor is deleted, all of its buy-from locations and
AP locations are deleted automatically. When you reinstate a deleted vendor,
the system reinstates all of the vendor's AP locations and buy-from locations.
A vendor and a buy-from/AP location cannot be deleted if any open purchase orders
exist for the vendor.
A purchase order cannot be created for a deleted vendor, a deleted buy-from location, or both. An error message is returned in this situation. If an unauthorized purchase order already exists when either the vendor or buy-from location is deleted, the purchase order cannot be authorized. An error message is displayed stating that the PO cannot be authorized and providing the Vendor Number, the Buy-From Loc (if applicable) and the Deleted Date.
To delete a buy-from location:
- From the main Materials
or AP Contents, select Vendors > Vendors.
The Quick Click menu appears.
- Under "I would
like to..." click Buy-from Locations, and enter the Vendor
Name. Click Go.
The list of buy-from locations for the vendor appears.
- Click Menu > Delete next to the buy-from location that you wish to delete.
The system sends you a message asking if you are sure that you want to delete
it.
- Click Submit.
The buy-from location is deleted.
To delete an AP location:
- From the main Materials
or AP Contents, select Vendors > Vendors.
The Quick Click menu appears.
- Under "I would
like to..." click AP Locations, and enter the Vendor Name.
Click Go.
The list of AP locations for the
vendor appears.
- Click
Menu > Delete next to the AP location that you wish to delete.
The system sends you a message asking if you are sure that you want to delete
it.
- Click Submit.
The AP location is deleted.
To delete a vendor:
- From the main Materials or AP Contents, select
Vendors > Vendors.
The Quick Click menu appears.
- Under "I would
like to..." click Delete, and enter the Vendor Name. Click
Go.
The system
sends you a message asking if you are sure that you want to delete the vendor.
- Click Submit.
The vendor is deleted.
To reinstate a buy-from location:
- From the main Materials Contents, select Vendors > Reinstate Vendor Locations.
- Click the Buy From Location tab.
A list of buy-from vendor locations that can be reinstated appears.
- Use the search and/or sort to locate the buy-from location of interest.
- Click Reinstate next to the location.
A confirmation message should appear.
Note: If you receive an error stating that the item requires a Vendor Invoice Number and Invoice Location, do the following:
- Click the Edit icon next to the location.
- Enter the required information for the location.
- Click Submit to save your edits.
- Click Reinstate next to the location.
- Click Submit to reinstate the buy-from location.
To reinstate an AP location:
- From the main Materials Contents, select Vendors > Reinstate Vendor Locations.
- Click the AP Location tab.
A list of AP vendor locations that can be reinstated appears.
- Use the search and/or sort to locate the vendor AP location of interest.
- Click Reinstate next to the location.
A confirmation message appears.
- Click Submit to reinstate the vendor.
To reinstate a vendor:
- From the main Materials or AP Contents, select
Vendors > Reinstate Vendors.
The list of deleted vendors
appears.
- Locate the vendor that
you wish to reinstate.
- Select Menu > Reinstate
next to the vendor.
Note: You can also
use the Menu to view the deleted vendor's buy-from locations and AP locations.
The system
sends you a message asking if you are sure that you want to "undelete"
the vendor.
- Click Submit.
The vendor is reinstated.
Using
Internal Departments as Vendors
Your site may use internal departments (such as a Print Shop) for some items
and services. An internal department used as a vendor must have a vendor record
set up in the system, just like any other vendor. Use the normal process for setting
up a vendor as described above. Here are some additional considerations:
- The in-house vendor record must contain a credit expense code.
- On the MM Information tab of the vendor edit panels, enter a GL account
code in the No Match - Credit Account field to receive the credit side of the GL transaction created when POs are received.
- Purchase orders for internal vendors have a PO Match Type of No Match.
- If the internal vendor produces non-stock or non-file items, the ordering department
is charged for the materials.
- If the internal vendor produces stock items, the On-Hand Quantity and its value
are increased so that the items can be issued when they are requisitioned.
- Purchase orders for internal vendors do not post to the PO Liability Account.
- When a PO from an internal vendor is received, the following transactions are
created:
- Debit to Organization/Asset Location inventory
- Credit to No Match - Credit Account code specified on the Vendor record.
Vendor Groups
You can create Vendor Groups if you need to perform various materials or accounts-payable
functions with the same set of vendors over and over. Once you create a vendor
group, you can assign vendors to it.
To
create a vendor group:
- From
the main Materials or AP Contents, select Vendors > Vendor Groups.
The Vendor Groups list appears. ( If you have no vendor groups assigned, No Data appears.)
- Click
New. The Vendor Group edit panel appears.
- Enter
a code for your vendor group in the Vendor Group Code field. Enter
a description of the vendor group in the Vendor Group Desc field.
- Click
Submit.
- Click
Refresh. The system refreshes the Vendor Groups list with your new code
added. You can now assign a vendor to your new vendor group.
Creating
and Viewing User Notes
From
time to time, you may need to attach a note to a vendor record (or to items
on other lists in the system). Figure 16 shows a yellow note pad icon next to a vendor
name on the Vendor List. The icon means that a note has been attached to the
vendor information. You may see note icons like this on other system lists
as well.

Figure 16 - User Notes Marker on a List
To
view user notes:
To read a user note, double click
on the yellow icon.
To
create user notes:
- Select Menu >
Add User Note next to the list item of interest. A blank note panel appears
for you to enter the note.
- Write your note in the
space provided.
- Click Save.
- Click Submit.
The system returns you to the list.
- Click Refresh
to see a yellow note pad icon next to the list item.
In addition to the Vendors list, you can create notes for many other lists in the system.
Vendor Order Cycles
Some vendors have a regular cycle of accepting and filling purchase orders.
You can enter vendor cycles in the system and then specify a vendor order cycle
for a vendor's buy from location. To identify vendor order cycles, use the Materials Management Tables.
To identify vendor order cycles:
- From
the main Materials Contents, select Tables > Vendor Order Cycles.
The Vendor Order Cycles list appears (Figure 17). ( If you have no vendor
groups assigned, No Data appears.)
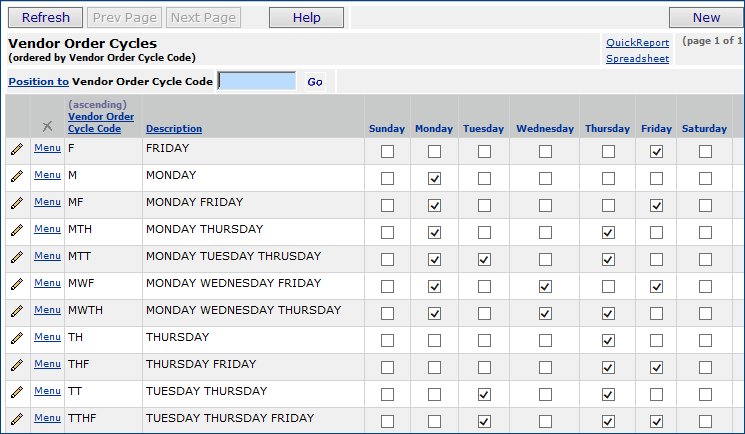
Figure 17 - Vendor Order Cycles
- Click New. The
Vendor Order Cycle Edit panel appears (Figure 18).

Figure 18 - Vendor Order Cycle Edit Panel
- Enter a code for the
Vendor Order Cycle and a Description for the cycle. Select each
day that the cycle includes.
- When you are finished,
click Save.
The system tells you if there are errors.
- Correct any errors,
if needed.
- Click Submit.
The Vendor Order Cycle is defined in the system. You can use the Vendor Order
Cycle Code on your purchase orders for vendors that have this particular cycle.
Set Up Links to Vendor Catalogs from Vendor Item Numbers
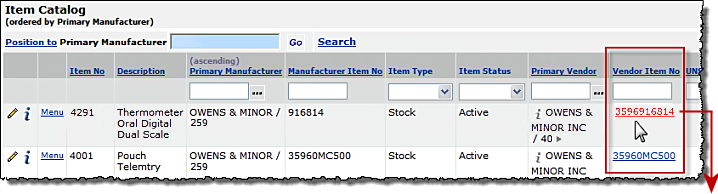
On an item list, clicking the Vendor Item Number (VIN) for an Owens and Minor-supplied item opens the Owens and Minor catalog entry for the item. Similarly, clicking the VIN for a Cardinal supplied item opens the Cardinal catalog. This feature is available from the system's item catalog, item inventory, vendor item list, and other panels that display lists of items including Vendor Item Numbers. The feature has two setup steps: one of the steps needs to be performed by the Help Desk.
- For example, to view the Owens and Minor catalog entry from an item record, click the Vendor Item Number (Figure 19).
 |
Setup steps for using this feature are below. |
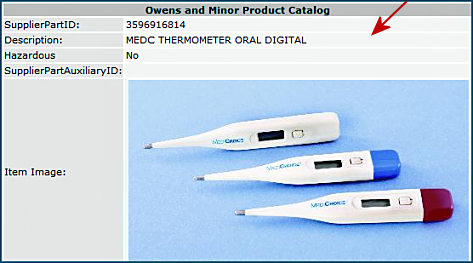 |
Figure 19 - Viewing the Owens and Minor On-Line Catalog Entry from an Item Record
Setup:
- Call the Help Desk and have them set a system property for linking to Owens and Minor or to Cardinal for your customer ID.
- For Owens and Minor, edit the Owens and Minor vendor record and select Owens and Minor in the field External Item LookupType (Figure 20).
- For Cardinal, edit the Cardinal vendor record and select Cardinal in the External Item LookupType field.
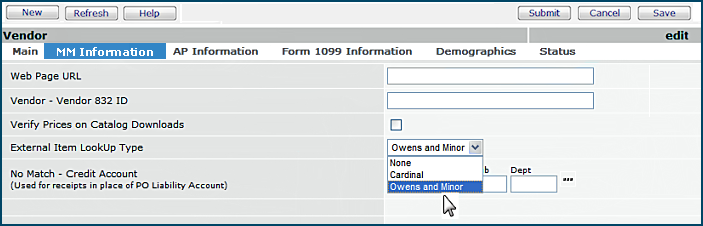
Figure 20 - Editing the Vendor Record
Audit Information for Vendors
For many lists in the system, various columns are audited. You
can view a record of changes to data in a list. The audit record includes the date
when a change was made, and the system ID of the user who made the change.
To
view audited vendor information:
- From the main Materials or AP Contents, select Vendors > Vendors.
- On the Quick Click menu...
- Select "I would like to ... View the Vendors List."
- Select "Ordered by... Vendor Name."
- Select "Starting with ..." and insert the Vendor Name.
- Click Go.
The list of vendors appears with the vendor at the top.
- Select Menu > View Audit Info.
The audit information appears. (Click Help for field
descriptions.)
One Time Vendors
Your site may use the Vendor Name OneTime as an "umbrella" for infrequent
or one-time vendors.
These vendors do not have a normal vendor record in the system. However, you can
create a vendor record at any time, should your needs require it.
Copyright © 2023 by Premier Inc. All rights reserved.