Set Up Charge Types and Distribution Profiles Version
Contents
Overview
A purchase order or an invoice may include lines for charges such as postage,
freight, special handling, special packing, or others. Supply Chain provides tools
to create charge lines and distribute charge amounts to the appropriate general
ledger accounts.
A charge amount can be handled in several ways:
- Allocated to a single general ledger account.
- Broken down, with an equal portion allocated to each goods
line account.
- Broken down, with a proportional amount allocated to each
goods line account.
The tools available to handle charges are:
- Charge Types. Each charge type assigns charges to general
ledger accounts according to a specified distribution method.
- Distribution Profiles. A distribution profile "pre-builds"
distribution lines for charges. Each distribution line contains either a percentage
to be calculated, or a specific dollar amount.
- Distribution profiles can be assigned to vendors.
- A default distribution
profile can be associated with a vendor. See Enter Detailed Vendor Information.
- You can assign a distribution profile to a vendor as the default for a particular organization only. See Overriding AP Location Values by Organization.
- You can also select a distribution
profile when you create an invoice for a purchase order. See Enter General Invoice Information.
As discussed in AP Tax Setup and Materials
Tax Setup, purchase orders and invoices can include taxes. The application can
automatically handle tax charges during invoice processing if a Tax Group
is assigned to the vendor AP location or to the organization.
- A Tax Group is a collection of tax rates. A tax rate designates
tax expense and liability account numbers for each organization that uses
the tax group. In processing invoices from a vendor AP location, the application
calculates taxes according to the tax rates, and distributes the tax amount.
Tax amounts can be distributed to a single account, or distributed proportionally
to goods line accounts and/or taxable charge line accounts.
This section explains how to set up charge types and distribution profiles.
See AP Tax Setup and Materials
Tax Setup for setup steps for taxes.
Security
The ability for any user to view, change, and create values in AP tables is controlled by the role object "APTables."
A separate role object -- "DistributionProfiles" -- controls the Distribution Profiles table. Initially, this role object has the same setting for a user as the role object "APTables." However, you can change the "DistributionProfile" role object setting to give users access to the Distribution Profiles table, without giving the users access to other AP tables, such as payment terms and discount terms.
To define Charge Types:
- From the Accounts Payable or Materials Management main contents, select Tables >
Charge Types.
The list of charge types appears (Figure 1), or No Data if no charge types
are defined.
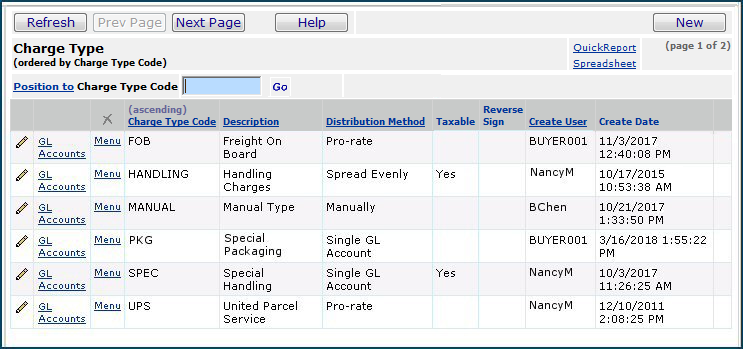
Figure 1 - Charge Type List
- Click New.
The Charge Type edit panel appears (Figure 2). The Distribution Method list is open.

Figure 2 - Charge Type Edit Panel
- Enter a code for the charge type in the Charge Type Code
field.
- Enter a Description.
- Select a Distribution Method. The options are:
Manually - You provide the GL account for the charges entered
on the invoice.
Pro-rate - Allocates charges to each goods line's
account in proportion to the total goods amount. On the invoice, you do not
need to enter a GL account for the charges since they will be spread among
goods accounts.
Spread Evenly - Allocates an equal amount of the charges
to each goods line.
Single GL Account - Allocates the total charge amount
to one GL account. Instructions for identifying the account are below.
- If the charge type is taxable, select the Taxable Charge
field.
- If you wish to reverse the sign (e.g., subtract the charge amount instead
of adding it), select Reverse Sign of Charge. This field is
useful when setting up a charge type for credits or returns.
- Click Save.
- Click Submit.
The Charge Type list is displayed. Click Refresh
to view the new charge type.
To associate a Charge Type with a GL account:
- From the Accounts Payable or Materials Management main contents, select Tables > Charge
Types.
The list of charge types appears (Figure 1).
- Next to the charge type of interest, click GL Accounts.
A list of charge type accounts for different organizations appears, or No
Data if no accounts are specified.
- Click New.
The Charge Type Account edit panel appears (Figure 3).
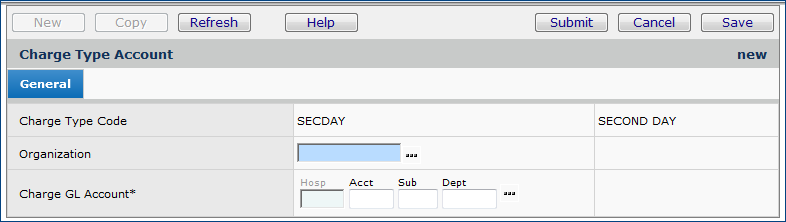
Figure 3 - Charge Type Account Panel
- Click the prompt to select an Organization.
- Select a Charge GL Account.
- Click Save.
- Click Submit.
The Charge Type Accounts list is displayed. Click Refresh
to view the organization and the account.
To create a Distribution Profile:
- From the Accounts Payable or Materials Management main contents, select Tables >
Distribution Profiles.
The list of distribution profiles appears (Figure 4), or No Data if no charge
types are defined.
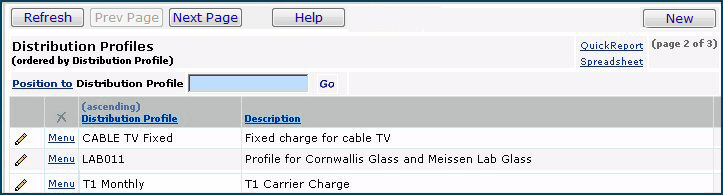
Figure 4 - List of Distribution Profiles
As an example, Figure 5 shows the distribution profile "A1 Monthly."
When this distribution profile is included in an invoice, the application automatically
creates the lines.
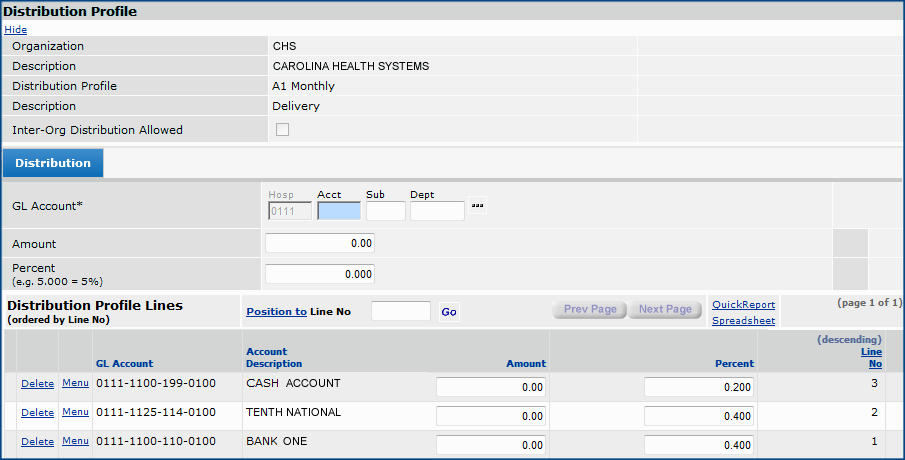
Figure 5 - Sample Distribution Profile
In Figure 5, notice the following:
- A monthly fixed charge is allocated to accounts associated with three departments.
- The charge is partitioned for each department according to the percentage
listed in the Percent column.
- Click New to create a distribution profile.
Figure 6 shows the panel for defining a new distribution profile.
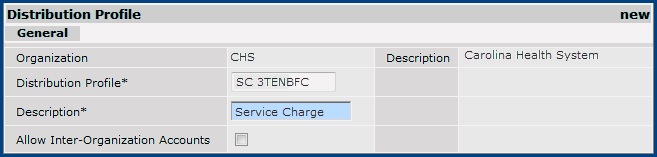
Figure 6 - New Distribution Profile Header Panel
- Enter an identifier for the distribution profile and a description.
If the distribution profile can distribute across multiple organizations at
your site, select Allow Inter-Organization Accounts.
- Click Save.
- Click Submit.
A panel appears for entering distribution lines (Figure 7).

Figure 7 - Panel for Entering Distribution Profile Lines
- For each line that you wish to include in the distribution profile,
enter a GL Account and either an Amount or
a Percent (but not both).
Note: The account code that you enter in the GL
Account field for a distribution line cannot be a statistical account.
- After you enter the information for each line, click Save,
then Refresh. The line appears at the bottom of the panel
(similar to Figure 5).
- When you are finished entering distribution lines, click Finish
Now.
The list of distribution profiles is displayed.
- Click Refresh.
Your new distribution profile appears, ready for use.
Delete a Distribution Profile
You can delete a distribution profile from the table, even if the distribution profile is specified on one or more invoices.
A distribution profile must be removed from any vendor records before you can delete it. When you delete a distribution profile from the table, the system removes the distribution profile from invoice headers and retains any invoice lines created from the profile. The application writes a system note for each invoice whose distribution profile is deleted.
Security: The user role object "CanDeleteDistProfile" must be set to All to authorize a user to delete distribution profiles (Figure 8).
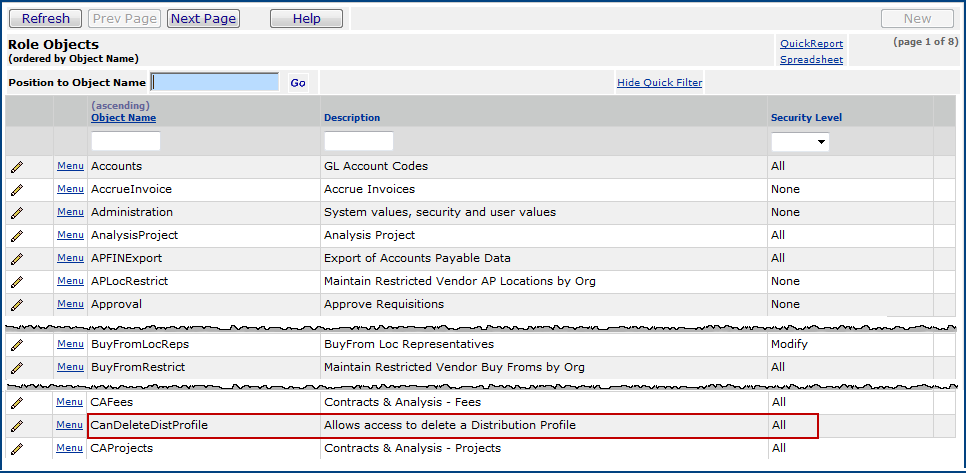
Figure 8 - Role Object for Authorizing Deletion of Distribution Profiles
To delete a distribution profile:
- Delete the distribution profile from the vendor record(s):
- From the Accounts Payable main Contents, select Vendors > Vendors.
The Vendors Quick Click menu appears.
- Use the Quick Click menu to locate the first vendor that uses the distribution profile.
- On the list of vendors, next to the vendor, select Menu > Edit, or click the edit icon
 .
.
The Vendor Edit panel appears.
- Select the AP Information tab (Figure 9).
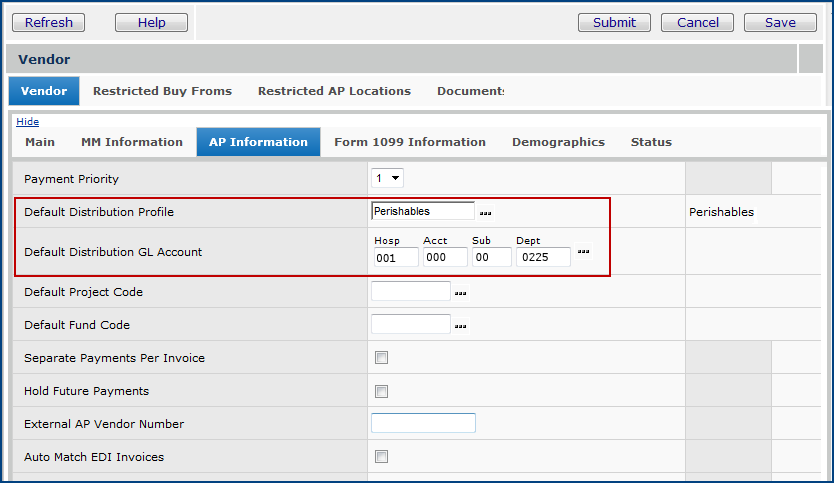
Figure 9 - Vendor AP Information Tab: Distribution Profile and Account
- Delete the fields Default Distribution Profile and Default Distribution GL Account.
- Repeat Steps 3 through 5 for any other vendors that use the distribution profile.
- Delete the distribution profile from the distribution profile table
- From the Accounts Payable main Contents, select Tables > Distribution Profiles.
The Distribution Profiles list appears.
- Locate the distribution profile of interest on the list.
- Click Menu > Delete.
The deletion job runs. If no errors occur, the distribution profile is deleted.
Copyright © 2023 by Premier Inc. All rights reserved.