Working With Lists Version
Contents
Overview
Much of the work that you do with the system involves using lists. Examples include
the Item Catalog, the Item Inventory (Figure 1), the list of outstanding
requisitions (Department Requisitions), the Vendors list, the
list of accounts, and many others.
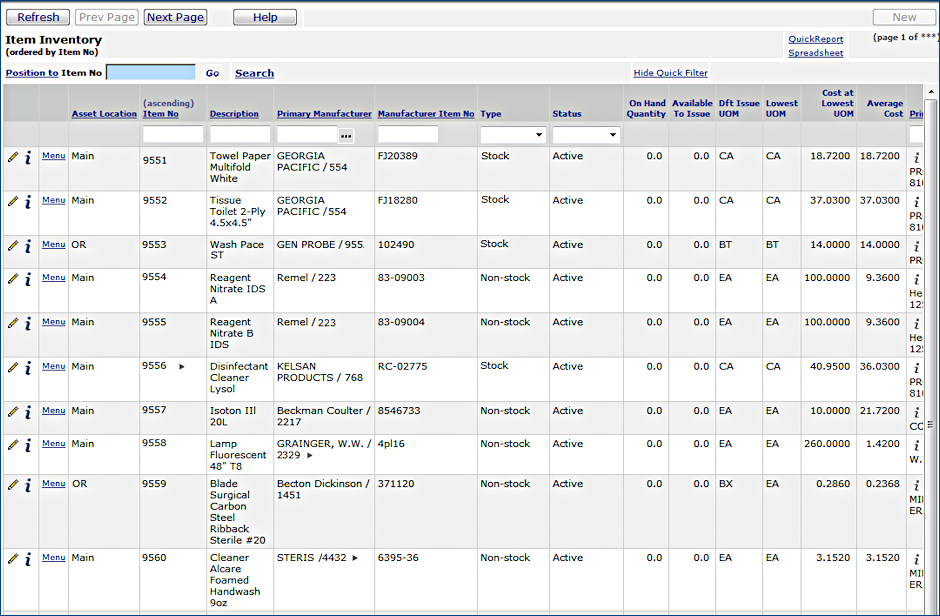
Figure 1 - Item Inventory List: All Asset Locations at a Site
The following paragraphs summarize the tools available on lists.
List Panel Tools
Edit and inquiry
In many lists, you can edit a list element, or open an inquiry on the element
to get detailed information. Two small icons appear on lists at the far left
of each row:
- Click the edit icon
 to open a list element for editing.
- Click the inquiry icon (i)
to get detailed information about a list element.
Menu and list actions
On many lists, you see the word Menu to the left in each row of the list.
Click Menu to select an action to take for the list
element.
Sometimes, a menu element on a list is grayed out, meaning not available. Mouse over the grayed out menu element to see why it is not available.
For other lists, one or more action words appear, either along with Menu,
or instead of Menu. For example, the Purchase Orders for Receiving list has the action Receive PO on each row Figure 2. (Click Receive
PO to create purchase order receipts.)
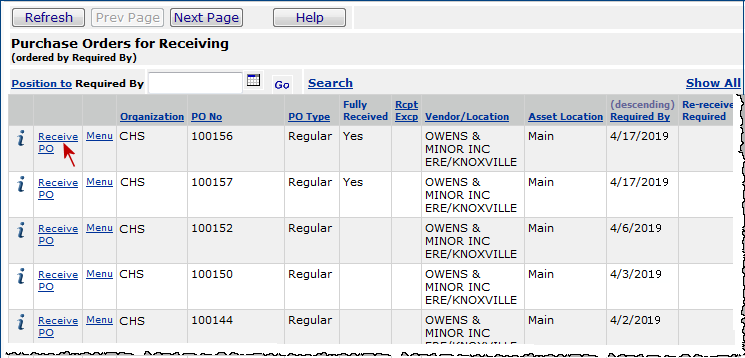
Figure 2 - List of Purchase Orders for Receiving
As you can imagine, the actions available in a Menu depend on the type of list.
Also, your user profile settings may determine what actions you are allowed
for a particular list.
Figure 3 shows the top of the Item Inventory list pointing out more tools.
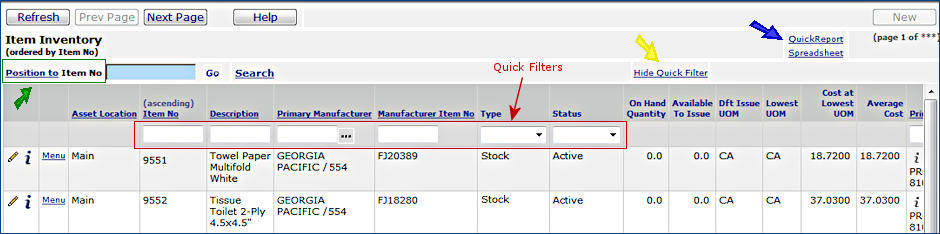
Figure 3 - Item Inventory List Showing Navigational Tools
Sorting list columns
You can change the sort order of any column in a list whose heading is underlined;
for example, Asset Location in Figure 3. The column heading contains
the current sort order, either ascending or descending.
Quick Filter
The red arrow (Figure 3) points out several list columns with Quick Filter boxes
at the top. In each Quick Filter box, you enter a value that you wish to find
in the column, and click Go. The system brings the row that contains the
value to the top of the list.
You can hide the Quick Filter by clicking
Hide Quick Filter (yellow arrow on the right). When the Quick Filter
boxes are hidden, clicking Show Quick Filter makes them visible again.
Position To
Position To (Figure 3, green arrow, on the left) is similar to the Quick
Filter. However, you can use Position To for columns that do not have
a Quick Filter box; for example, Asset Location in Figure 3.
To use Position
To...
- Activate a column by clicking on its header.
- Enter a value in the Position To box.
- Click Go. The row containing the value is displayed at the top
of the list.
Important: If the text that you enter contains a trailing blank -- that is, an empty space at the very end -- Position To will not find the text. Double check that you have no trailing blanks. Also, if you copy text from a .pdf or other file, it may contain invisible or invalid characters, such as a vendor registered trademark symbol. Position To will not find the character string, so you may wish to key in the value, rather than copying it.
Search
Click Search to perform a detailed search on a list. The Search panel appears.
Various fields are available on each Search panel, depending on the list. For
example, in using Search with the Item Catalog, you can search for items by Status, Type (stock or non-stock), Primary Vendor,
Primary Manufacturer, and several other criteria. You can also
search for text that describes the item.
Quick Report and Spreadsheet
Clicking Quick Report creates a formatted, printable version of a list.
You can configure several characteristics of the list's format. See the discussion
below.
Clicking Spreadsheet creates a copy of the list formatted as a Microsoft
Excel spreadsheet.
You can use Search in combination with Quick
Report or Spreadsheet. For example, you could print a list of all items from
a particular manufacturer, all POs with "required" dates in a certain
time period, all minority or female vendors, and so on.
Next Page / Prev Page
Scroll a list forwards and backwards using
the Next Page and Prev Page buttons. Long lists are limited to
an initial fifteen pages, but you can get more pages by searching for the next
consecutive element on the list.
New and other buttons
Some lists contain an active New button. Clicking New displays
an edit panel with fields for entering information to create a new list element.
For example, on the Purchase Orders list, clicking New lets you create
a new purchase order.
Other buttons appear on lists, depending on the type of list, and the system
feature. For example, Submit and Cancel may appear on transaction
lists.
Help
Clicking Help provides information about the columns on the list, and
displays links to detailed documentation and to the documentation indexes.
To edit a list element:
- Locate the element you want to edit.
- Next to the element, select Menu > Edit or click the pencil icon
.
the system displays editable information for the element, including fields that
may not be visible on the list.
- Edit the fields that you need to change. (Not
all fields may be editable.)
Note:
When you are completing fields on a edit panel (such as when you are creating
a purchase order), the system may require some fields to be completed.
Required fields are marked with an asterisk *.
- When you are finished editing, click Submit. If there
are no errors, the system makes the changes, and returns you to the list.
- If the system finds problems with the changes
you have made, you get error messages. Correct the errors, and click Submit
again.
To delete a list row:
Menu method
- Locate the row that you want to delete on the appropriate list.
- Next to the row, click Menu.
A pop up panel appears.
- Click Delete.
The system asks you if you are sure that you want to delete the row.
- Click Submit if you are sure. Otherwise,
click Cancel. You are returned to the list.
Note: In some lists, Delete requires
a Reason Code. You are prompted to select one.
Quick Delete method
Lists with Quick Delete have a small X
at the top of the Menu column (Figure 4).
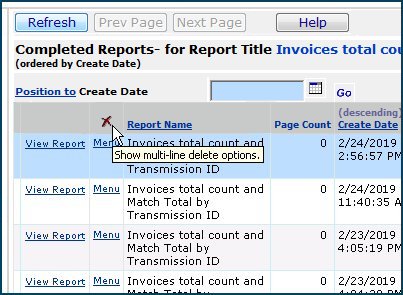
Figure 4 - Quick Delete X in List Panels
- Click the X to open the
Quick Delete box (Figure 5).
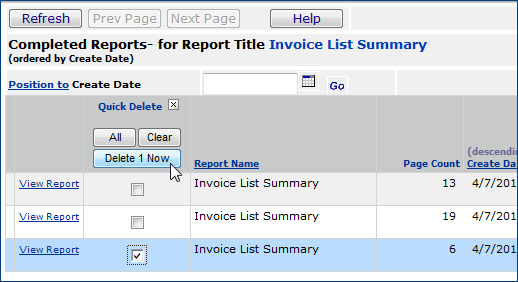
Figure 5 - Quick Delete Box for a List
- Click the box for any row to select the row for deletion.
- Click All to select all rows.
- Click Clear to clear all selections.
- After you select a row or rows, click Delete [number]
Now to delete the row(s).
(Number is the number of rows.) If you have selected
All, [number] is the total rows to
be deleted.
Note: Quick Delete applies
to one page at a time. If you have a multiple-page list, you need to scroll
forward (Next Page) and use Quick Delete on each subsequent
page.
To copy a list element:
- Locate the element that you want to copy on
the appropriate list. (Note: Copy is not available on some lists.)
- Next to the element, click Menu. A pop up
panel appears.
- Click Copy. The system displays an expanded
version of the element, including fields that may not be visible on the list.
Important: If you are working with the Item Catalog, it is possible to copy an item
from another item, but the copy process will not establish the proper vendor
information. The copied item will have a Status of Incomplete,
and you will not be able to requisition it or order it until you fill in vendor
information. The preferred way to add items is through Consolidated Item
Add from the main Contents.
- Click Submit. The system copies the element and returns you
to the list.
User Notes
Many lists support the User Notes feature. Notably, you can create user notes on receipt lines, requisition lines, PO lines, invoice lines, and rows on other lists as well.
- Requisition line user notes flow to the purchase order and to the receipt.
- Receipt line user notes flow back to the associated purchase order.
A yellow flag  appears next to a list element that has user notes. You can can link a document to a User Note, and you can view a linked
document from a User Note. The discussion below describes how to create and
view user notes, and how to link from a note to a document.
appears next to a list element that has user notes. You can can link a document to a User Note, and you can view a linked
document from a User Note. The discussion below describes how to create and
view user notes, and how to link from a note to a document.
To view user notes on a list element:
- Click the yellow flag
to view the notes. The system displays user notes.
(You can add a user note by clicking New. See below.)
- When you are finished reading the notes, click the tab to close (if you are using tabs with Internet Explorer) the note or click the Back button.
The system returns to the original list element with the yellow tag.
Viewing linked documents:
- Click the yellow flag
to view the notes. The User Notes list is displayed (Figure 6).
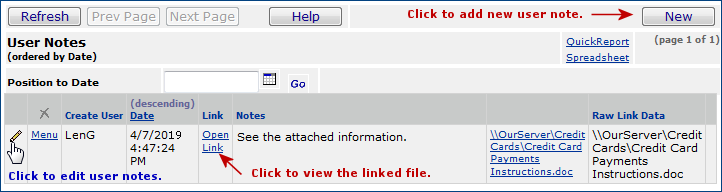
Figure 6 - User Notes Panel
- In the Link column, click Open Link.
The linked document is displayed. How to make a link to a document is described in the next section: "To create User Notes."
To create user notes and document links:
Creating user notes
- Locate the list row that you want to make a note for.
- Click Menu > Add User Notes. Or, click the Add Note icon.
The User Notes panel is displayed (Figure 7).

Figure 7 - Creating a User Note
- Click in the User Note field and enter the notes
- You can link a document to the note, or click Submit to complete the note.
Linking a document to user notes
If you wish to link a document to the user notes, do the following. (Otherwise,
go to Step 5)
- In the box next to External Link, enter the location and
name of the document file.
The location can be a URL (that is, a web address beginning with http://)
or a path to a file in your network (beginning with \\).
Restriction: You cannot create
a link to a file on your computer's local disk drive.
Local drives begin with C:, D:
or sometimes E: -- these locations are not valid for
the link. The linked file must be a network
location.
- Key in the file location, or click Find file to
search for the file and select it.
- You can link to files with extensions .htm, .pdf, .xls, .doc (and other Microsoft Office formats), .jpg, .gif, .wav files, and others.
Find file opens Windows Explorer. (Figure
8).
Important: The file that you identify must be on a shared network drive. If you create a link to a file on your own PC, other users will not be able to access the file.
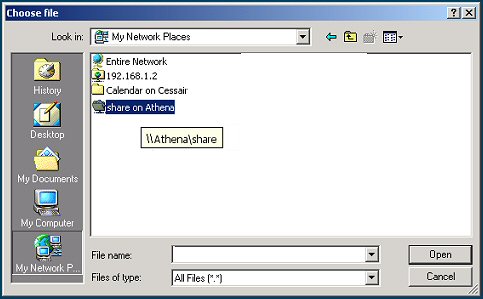
Figure 8 - Browsing for a the Location of a File
- Click Submit when you are finished.
- Click Refresh to view the notes you added.
Once you have created user notes, you can edit the notes by clicking the edit
icon next to the notes in the User Notes list.
To view system notes on a
list element:
- Locate the element on the appropriate list.
- Next to the element, select Menu > System Notes.
- If there are no notes, the system displays the System Notes panel, with No
Data at the top.
- If system notes exist, the system displays them.
To view audit information:
In some lists, elements can be changed or edited by users. The system keeps a
record of who has made changes and what the changes were. This record is called
"audit" information.
- Locate the element on the appropriate list.
- Next to the list element, select Menu >
View Audit Info.
The information is displayed.
- Click Back to return to the list.
Note: Not all fields are audited. Those fields that
are audited vary from list to list.
To
use Inquiry to get more information about a list element:
- Click i or
- Click Menu > Inquiry next to the element.
The system shows you more detailed information.
To change the order of a
column:
You can change the sort order of columns with an underlined header.
- Click the underlined column header.
The sort order changes, and the word ascending
or descending appears.
To position a list to
a column value:
- Click the underlined header of the column. (For example, in the Item Inventory,
to position the list to a particular item number, you would click the Item
No column.)
The name of the column appears after "Position
to" next to the search box.
- Enter the value in the search box.
Important:
In searching for a date, you must enter the slashes
between the month, day, and year. For example: 11/09/2022. You can also abbreviate
the year to two numbers: 11/09/22.
- Click Go. The list
is displayed so that the row containing the value is at the top.
To use Search
You can use the Search feature from the Quick Click menu, or from
a list that you have displayed.
- From Quick Click, click Advanced Search.
- From any list, at the top of the list, click Search.
A Search panel appears with fields you can check or fill in to tell the system
what to search for. For example, if you are working with the item catalog,
you can search for one or more items based on Status, Type,
Primary Vendor, Primary Manufacturer, Item
Class, Commodity Code, whether the item is Reusable,
and several other criteria.
Each Search panel contains different fields, depending on the type of list
you are searching.
- Enter values in fields and/or check boxes to tell the system what
to search for. You can check more than one box and enter values in more than
one field. (You cannot specify values that are mutually exclusive, of course.)
Specifying Search Words
You can specify Search Words for some system lists.
Note: The system cannot search on a single character.
If you enter a single character in the Search Words field, you
will get an error message.
Here are some of the lists where you can use Search Words, and the
field or fields that the system searches.
Item Catalog List - Item Description,
Item Alias and the item's Search Words fields.
Although the Item Alias and the item's Search
Words fields do not appear on the Item Catalog list, they do exist in the system's
databases for each item. The person who created an item may have entered values
in the Item Alias and/or Search Words fields.
If so, and you know the values, the system can find the item and place the item
at the top of the list.
Vendors list
- Vendor Name field
Purchase Orders list - Buy
From Name field.
The Buy From Name field is not on the Purchase Orders list, but it
does exist for each purchase order in the system's databases. If you know the Buy From Name that you want, the system can find it, and place the purchase
order at the top of the list.
Non File Item Transactions list -
Item Description field
Requisitions list - Req Description field
Order Guides list - Order Guide Description
field
Par Carts
list - Par Cart Description field
Department list - Department
Description field
The Department Description field is not a column on the Department list, but it does exist for each department in the system's databases. If you
know the Department Description that you want, the system
can find it, and position the department to the top of the list.
Date Formats:
The system's Search can look for a date
entered in any of the following formats:
MM/DD/EYE (e.g., 03/12/2022)
MM/DD/YY (e.g., 03/16/22)
M/D/YYYY (e.g., 3/2/2022)
M/D/YY (e.g., 3/2/22)
- Enter a date in one of the formats.
- Click Submit. A new list appears containing only elements
that meet your search criteria. You can print
this list, if you like.
To create and save a formatted
list with Quick Report:
- Locate the list that you wish to print.
- Use Search to filter the list so that it contains
only the elements you want it to contain.
- When you have the elements on the list that
you want, click Quick Report (in the upper right-hand corner of the
list).
A new browser window displays a formatted version
of the list. The menu appears
at the top.
- The Configure menu switches on and off.
If the menu is not visible, click Configure.
-
To get a count of rows in a column:
- Click the open bullet next to Add Report
Totals.
- Click the name of the column for
which you want a count.
The count appears at the bottom of the list.
-
To count groups in a column for each row:
- Click the open bullet next to Add Group Totals.
- Click the names of the columns for which you want a group count.
The totals appear under each row that is the last row in the group.
Note: You can undo changes that you made with the Configure menu by clicking
View > Refresh on the browser's toolbar.
- On the browser's toolbar, select File > Save As. The
Save panel appears.
- Select the location for your file from the prompt (...) in the Save
in: box.
- Type a name for your file in the File name: box.
- Choose the format in which you wish to save your report from the Save
as type: prompt (...).
- Click Save. Your file is saved.
To print a Quick Report from a list:
- Select the list from which you would like a report.
- Use the Search panel to filter the list so
that it shows the elements you wish.
- Click Quick Report.
- Use the Configure menu to remove columns,
or get report or group totals,
- When you have edited your report columns as
you wish, use the Microsoft Internet Explorer print facility to print it.
- Click the IE 11 Explorer Settings icon  .
.
- Select Print Preview to display your report before printing it, or select Print to proceed directly to printing.
- If you like the way your list looks in the preview display, click Print.
- If your list is too wide to fit on the page, you can do one or both of the
following:
- Change the page orientation to landscape.
- Click Close to close the Print Preview
Window. The formatted list reappears.
- On your browser task bar, select File
> Page Setup.
- In the Orientation field, select
Landscape. Click OK.
- Select File > Print Preview again
to see if the list format fits better on the page.
- Remove columns
from the formatted version of the list.
You may need to remove columns and set the orientation to Landscape
if your list is wide.
- Select File > Print Preview again to see if the list fits better
on the page. If so, click Print. If not, you can try removing
more columns.
The system sends the report to your printer.
Copyright © 2023 by Premier Inc. All rights reserved.