Work with User-Defined Fields Version
Contents
Overview
You can
define fields in system lists to contain information specific to your needs,
and identify the type of information that the fields contain. Such fields are user-defined
fields.
This topic describes how to view the user-defined fields that are available for a list, and how to create new user-defined fields.
Note: If you are working with Sourcing and Contract Management, you should also read the separate discussion of user fields which covers some specialized features for that application.
Security
The "MMTables" role object controls access to user-defined fields.
- For access to user-defined fields from the Materials Management Tables menu, the minimum setting is Modify.
To view user-defined fields for a list:
-
On
a list page, (i.e. departments, item inventory, requisitions) locate the
record for which you want to view user defined fields.
-
Next
to the record, click Menu > User Fields. The user-defined fields
for the list appear, along with the value of each field and its description.
To view all user defined fields:
-
From
the Materials Management main Contents, select Tables > User
Defined Fields. The system displays the names of lists that it uses.
-
Click View User Fields next to a list name. The
user-defined fields for the list are displayed.
To
create a user defined field in Materials:
-
From
the Materials Management main Contents, select Tables > User
Defined Fields. The system displays the names of lists for which you can
create user fields (Figure 1).
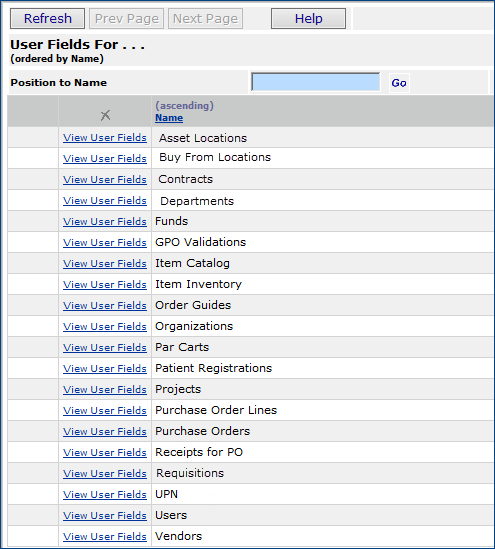
Figure 1 - Lists That Support User-Defined Fields
-
Locate
the list for which you want to create user-defined fields.
-
Click
View User Fields. The user-defined fields (if there
are any) for the list are displayed. If the list has no user-defined fields, No Data
appears.
-
Click
New to add a user-defined field. The User Defined Fields panel appears.
-
Enter
the name for the field in the Name for Field box. The field name
can contain up to 15 alphanumeric characters.
- Enter
a description for the field in the Description box.
-
Click
Submit. The system returns you to the User Defined Fields panel.
-
Click
Refresh to see the new field you created.
- To create values for the field...
- Click Menu > Field Values next to the field (Figure 2).
Figure 2 - Defining User Field Values
- Click New to create a new value.
The User-Defined Field Values panel appears.
- Enter the Field Value and Description on the panel.
- Click Save.
- Click Submit.
The system returns to the User Defined Field Values list.
- Click Refresh.
- Click Back to return to the User Fields list.
The new field and its values are now available for use in the list for which
you created the field; e.g., Asset Locations, Departments, etc.
Copyright © 2023 by Premier Inc. All rights reserved.
