Fax a Purchase Order Version
Contents
Overview
You will
want to communicate some purchase orders to vendors via FAX. This section describes the methods, the setup steps,
and the basic procedures.
The methods of faxing a purchase order are:
- Use the automatic FAX feature.
This feature sends a PO as a FAX to a vendor buy-from location automatically when the PO is authorized. You can use automatic faxing with a regular, blanket, or standing purchase order.
-
The automatic faxing feature requires no additional equipment or software beyond what a site currently uses for the system.
Similar to EDI, automatic faxing from within the system is a "pass through" communication: information is transmitted from a hospital to a vendor via the system host. A nominal per-page fee applies to faxes generated with the automatic fax.
To use automatic faxing, you must contact the Help Desk so that the feature can be turned on for your site. Also, you need to include the FAX number for the vendor buy-from location in the buy-from location record.
- FAX a copy of a purchase order manually using
your existing printers that have FAX capability.
You
may have a local or network printer at your site that is equipped to send and
receive faxes. If so, you can fax a PO using
WinFax� PRO. Using WinFax PRO is very
much like printing to a fax printer, except that you have more options. Information on how to acquire WinFax
PRO is at the end of this section.
Security
ePHI Features -- Bill-Only Purchase Orders
Features are built into the system to ensure the privacy of electronic protected health information (ePHI), in compliance with HIPAA requirements. One applicable area is faxing (and printing) of bill-only purchase orders which contain patient-identifying data (on the Case Info panel).
On a User Profile, the Hide ePHI Data field determines whether a user can access patient data. When Hide ePHI Data is checked, a detailed series of restrictions apply to the user's access to ePHI records. Patient information in the PO FAX feature is subject to restrictions governed by this User Profile field.
In sum, if Hide ePHI Data is checked, the system does not display patient-identifying information.
The list of restrictions and examples is outlined in the ePHI documentation.
User Access to Purchase Orders
To access organization, department, or asset location data, the organization, department, or asset location must be included in your data profile.
The "Purchasing" role object setting Create (or All) allows you to create and copy purchase orders.
Use the automatic FAX feature - setup
Once the Help Desk has enabled automatic faxing for your site, you need to make sure that the vendor buy-from location record contains a FAX number.
To enter the FAX number on a buy-from location record:
- From the Materials Management main Contents, select Vendors > Vendors.
The list of vendors appears.
- Locate the vendor of interest
- Select Menu > Buy-From Locations.
Locate the buy-from location to which you will be faxing POs.
- Click Menu > Edit or
 . The buy-from location record appears (Figure 1).
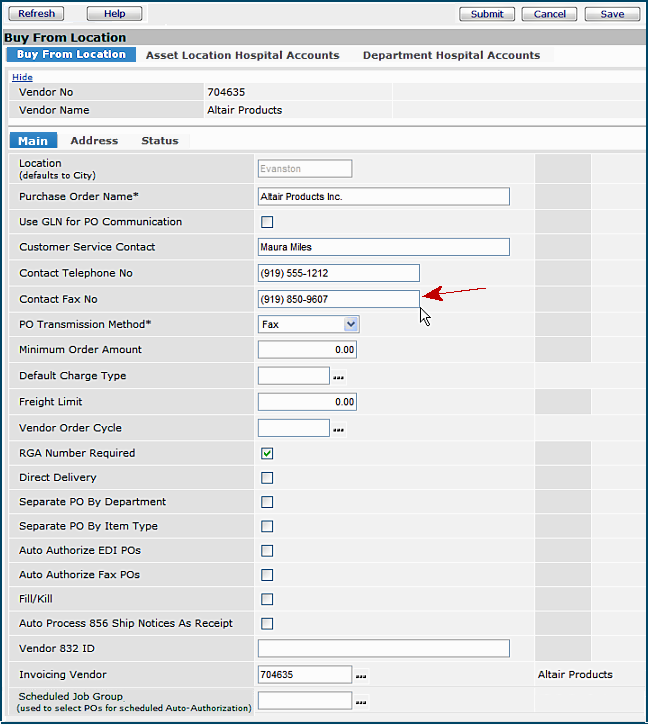
Figure 1 - Vendor Buy-From Location Record Main Tab
- On the Main tab, enter a FAX number in the field Contact Fax No.
- Click Save, and Submit.
The buy-from location is ready for you to send faxes.
To fax a purchase order automatically:
- Select a purchase order generated by the system, or create the purchase order manually. (See Create a Purchase Order Manually, if needed.)
- Edit the purchase order.
Note:
To edit a purchase order, from the Purchase Orders list, click the edit icon next to the PO.)
- In the PO Comm Type field, select Fax (Figure 2).
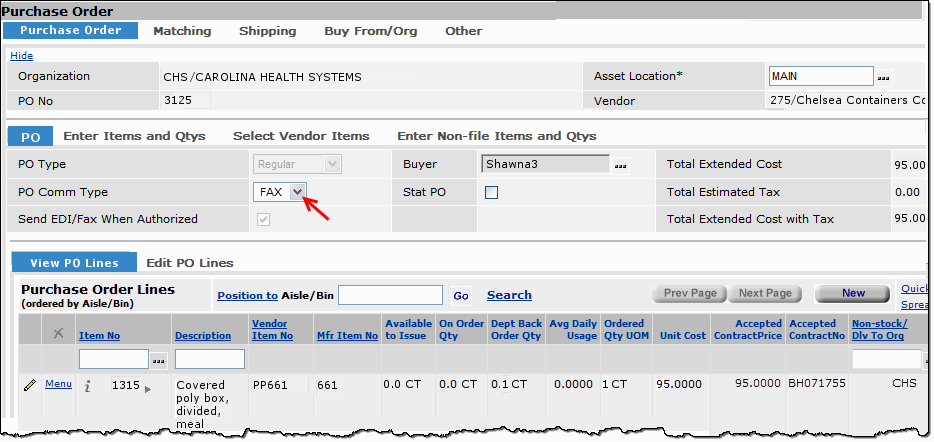
Figure 2 - Setting the PO Comm Type So That the PO Is Automatically Faxed
- Enter lines on the PO for the items that you are ordering.
When you are finished entering lines...
- To authorize and send the PO as a FAX right away, click Authorize Now.
- Or, to authorize the PO later, and send it as a fax, click Authorize Later.
The PO will be available from the list of POs ready for authorization.
(From Materials Management select Purchasing > Authorize PO.)
On the Purchase Orders List:
Clicking Menu > Authorize PO authorizes the purchase order, and, if you select the box Send Fax Now, also faxes it.
Clicking Menu > Send/Resend EDI/Fax POs faxes the PO.
You can view the PO Comm Type on the PO Inquiry panel for any purchase order.
- In the Purchase Orders list, click the i next to a PO number. The PO inquiry appears.
- On top, click the PO tab. The PO General panel appears on the bottom.
The PO Comm Type is included on the left of the General panel.
The FAX Cover Sheet
For automatically-faxed purchase orders, the system generates the FAX cover sheet from information supplied on the purchase order itself. Figure 3 is a typical FAX cover sheet and purchase order. The figure shows the fields on the cover sheet that correspond to fields on the PO.
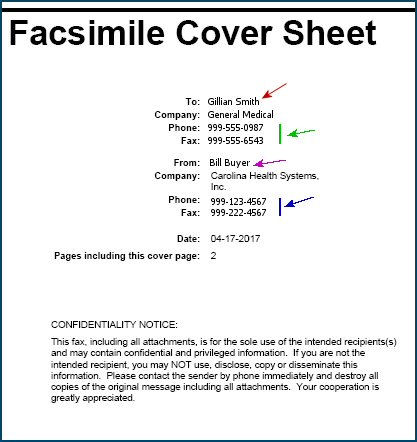

Figure 3 - FAX Cover Sheet and Purchase Order
Automatic Authorization of FAXed POs
Some sites find it efficient, for selected vendors, to let the system automatically
authorize and send generated FAX purchase orders. One efficient use of automatic authorization
involves purchase orders that are generated from requisitions imported from dispensing units (such as Pyxis).
Note: Manually-created purchase orders cannot be auto-authorized.
Security: To set up automatic authorization, you need permission established in your user profile for purchase order authorization and for scheduling jobs. You may also need access to Tables (if you need to create Scheduled Job Groups to assign to buy-from locations).
To use auto-authorization, you must configure the vendor buy-from location. (The topic Working With Vendor Information explains the fields on the vendor Buy-From Location panel.) Then, you create a scheduled job to run the authorization.
- On the Vendor Buy-From Location panel:
- Make sure that the PO Transmission Method is FAX.
- Select the field Auto
Authorize Fax POs on the vendor Buy-From Location panel.
Important: If this field is not selected, the system
cannot automatically authorize a FAX PO for the buy-from location. In this
situation, a system note is written to the PO.
- Select a value in the Vendor Order Cycle field.
Automatic authorization works together with the Vendor Order Cycle established
for a vendor buy-from location. For each purchase order to be automatically
authorized, when the auto-authorization job runs, the system looks for a Vendor
Order Cycle for the PO's buy-from location.
- If no Vendor Order Cycle is established, the system assumes "today" and authorizes the PO.
-
If a Vendor Order Cycle exists and is valid for the current day, the system
authorizes the purchase order.
-
Otherwise, the system does nothing until the auto-authorize job runs again.
Then the PO is evaluated again, and compared with the Vendor Order Cycle value.
- If you are authorizing FAX purchase orders for groups of vendors, select a Scheduled Job Group.
- Using the job scheduler, create a batch job -- Process Auto
Authorize Fax PO -- that authorizes and sends the POs.
Details on the setup process are in this topic: Auto-Authorize EDI, email, or FAX POs by Buy-From Location.
Hospitals that use auto-authorization of FAX POs often find it efficient to create a daily scheduled job to run the authorization before the earliest vendor order cutoff time. If you are setting up auto-authorization for POs based on imported requisitions, be sure to schedule the auto-authorization job so that its timing meshes correctly with the timing of the requisition import.
Note: Stat POs (created from Stat requisitions) are not included in the automatic authorization unless the Auto Authorize Stat POs flag has been set on the asset location record.
Purchase Order Auto Authorization Status field
The Auto Authorization Status field on the Purchase Order edit Other tab
provides information about authorization status and eligibility. Values are:
Not evaluated - Default value for FAX POs. The PO's vendor buy-from location
has not been evaluated. If the PO is an auto authorize FAX PO, the
auto authorization process updates this value when the scheduled authorization
job runs.
Not eligible - The PO is not a FAX PO.
Eligible - The PO is a FAX PO and the buy-from location is set to auto authorize.
The Automatic FAX Log
You can get detailed data from the FAX log on automatic faxes that you send. If you have administrator privileges, you can get information on all faxes for your site.
To view the log of your faxes:
- From the Materials Management main Contents, select Purchasing > Purchase Orders (by PO) or Purchase Orders (by Create Date).
The list of POs ordered by PO number or by create date (as you selected) appears.
- Locate the purchase order of interest in the Purchase Orders list.
- Click Menu > View Faxes. The FAX log for the PO appears (Figure 4).
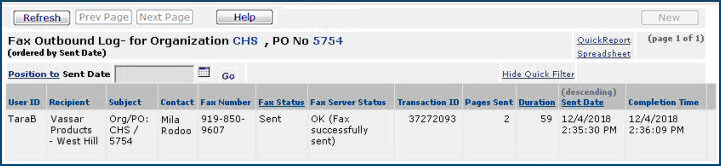
Figure 4 - The Outbound FAX Log for a Purchase Order
The FAX log lets you check the vendor buy-from location (Recipient) and the Contact, the Fax Number, and other information:
- The Fax Status identifies the "send" status of a fax. Values are:
OK - the FAX was sent successfully.
Staged - the FAX is pending.
Sending - the FAX is being sent.
Sent - the FAX has been sent.
Error message - a problem exists with the fax, and it cannot be sent.
Fax Pending - the FAX is queued for sending, but has not been sent.
Faxing Error - the FAX has a problem and cannot be sent.
These columns may be useful for trouble-shooting:
- Pages Sent is the number of pages faxed, including the cover sheet.
- Sent Date is the date and time when the user authorized the PO to send the fax.
- Completion Time is the system date and time when the FAX actually was sent. Since network and phone system factors are involved, the Completion Time will normally be slightly different from the Sent Date.
- The time difference between Sent Date and Completion Time is in Duration.
To view the administrator's FAX log:
- From the Work in Administration menu, select EDI/Fax Management.
- Select PO Faxes. The list of faxes appears. (Figure 5).
- You can sort on Organization, PO Number, and other values.
- You can create a report by clicking Quick Report on the top right of the list. With a Quick Report, you can generate the total number of faxed pages.
- You can also create a spreadsheet version of the report, and perform spreadsheet calculations on the data.
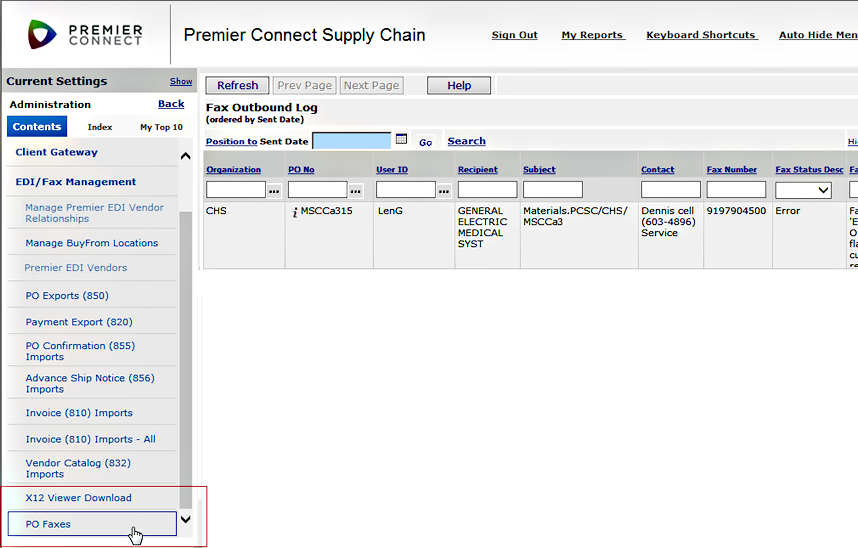
Figure 5 - Administrator's FAX Log
FAX via existing
printers that have FAX capability
Sending a FAX from a printer is almost as simple as printing. Here are some
notes to get you started.
- For network printers with FAX capability,
users must have the authority to fax from the printer via the network.
- You can set up network printers for faxing
using the MS Windows Print dialog box.
- For local printers with FAX capability,
the setup is the same as for a network printer, but you don't need to be concerned
about users' authority to fax over the network.
To send a FAX
from a local or network printer:
- From the Materials Management main Contents, select Purchasing > Purchase Orders (by PO) or Purchase Orders (by Create Date).
The list of POs ordered by PO number or by create date (as you selected) appears.
- Locate the PO of interest.
- Next to the PO, click Print PO. Adobe Acrobat Reader opens and the
PO appears -- ready for printing or faxing.
- Select File > Print from the Microsoft Internet Explorer Menu
bar. The Print dialog box appears.
Important: Do not click the printer
icon. The printer icon does not let you select the FAX printer from the printers
you have set up on your PC, nor does it give you the FAX options.
- On the Print dialog box, use the drop list following
Name to select the printer that you know has FAX capabilities.
- Select Properties. Use the drop list following Print/Fax
Job Type to select Fax, as shown in Figure 6.
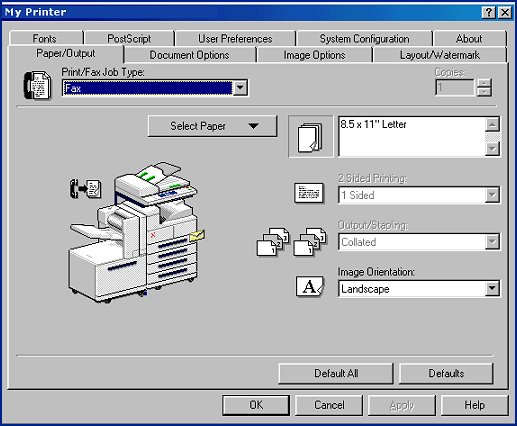
Figure 6 - Print Dialog Box for Sending a FAX
- Click OK. The Properties window closes.
- Click OK again. The Printer window closes and the Fax Setup dialog
opens. (See Figure 7.)
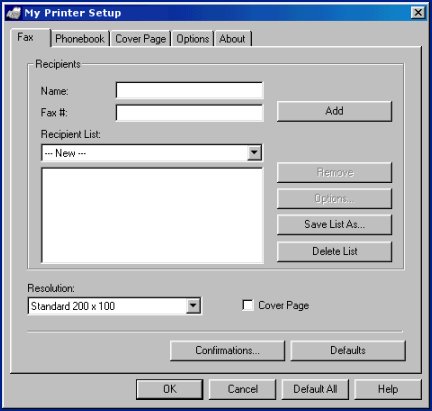
Figure 7 - FAX Setup Dialog
- Select the Fax tab to identify the recipient
of the fax.
- Enter the recipient's
name in the Name: field and the FAX number in the Fax # field.
- Select the Cover Page
box if you wish to include a cover page.
- If your FAX includes a cover page, select the
Cover Page tab to configure the cover page.
- If you would like a confirmation of your fax,
go to the Options tab and select Generate Confirmation Report After
Send.
- To get more information about FAX setup choices,
click the Help button on the Fax Setup panel.
- When you have finished setting options,
click OK to send the fax.
Fax via WinFax™ PRO
If you do not have WinFax™ PRO on your local
system or network, see the discussion
below. The following instructions explain how to set up WinFax PRO and send a fax.
To set up WinFax PRO:
- Open the WinFax Message Manager and
start the Program Setup. Follow this path: Message Manager >
Tools > Setup > Program Setup.
- Select options for your FAX transmission. The
following are some of the options:
General tab:
Dialing - Off-peak
schedules faxes to be sent during off-peak hours, when long distance rates might
be lower.
Location - Sets
your area code. Also, you can set options that specify your modem; tell WinFax
whether or not to use a dialing prefix; use "9" to access an outside
line; or blocking call waiting.
Calling Card - Set
up calling card numbers and pins.
Modems and Other Fax
Devices - Sets up modems or network sharing.
Microsoft Exchange/Outlook
icon - Sets either Outlook or MS Exchange as your mail system. You can use
your mail system for Contact FAX numbers, for keeping copies of faxes that you
send, and for keeping confirmations that you receive when faxes are delivered.
User icon - Sets
up your identification, i.e. name, company name, your FAX number and voice number,
and the identifier of the PC you are sending from.
Send icon -
Specifies the use of a FAX wizard, or no wizard, whenever you fax a document.
Printer
Driver - Sets Orientation to Landscape or Portrait.
Set Landscape if you are only going to use WinFax for faxing Purchase
Orders. If you select Landscape with Printer Driver, you will
not have to change it each time you fax a Purchase Order.
To make all of these settings, you can choose
Properties or use the Guided Setup.
To fax purchase orders
using WinFax PRO:
In the first few steps, using WinFax is the same
as printing to a FAX printer. When you are setting up the FAX itself, or at
any time afterwards, you can ask WinFax to walk you through the process using
a wizard.
- From the Materials Management main Contents, select Purchasing
> Purchase Orders. The Quick Click menu appears.
- Under I would like to..., select Print
PO.
- Enter the PO number in the PO No field
under For...
- Click Go. Adobe Acrobat Reader opens
and the PO appears -- ready for printing or faxing.
- Select File > Print from the Microsoft
Internet Explorer Menu bar. The print dialog box appears.
- In the printer name drop down box, select WinFax.
- Click the Properties button and change
the Orientation to Landscape.
Note:
You can specify Landscape permanently in your Program Settings. Setting
it permanently works best for Purchase Orders.
-
Select OK.
WinFax prompts you for
a recipient name, FAX number, and company. You can type these in, select them
from a saved phone book, or select them from Contacts in you Microsoft
Outlook Address Book.
- Enter the information for the FAX destination,
and click OK.
If you are not using the
wizard to walk through the setup, the WinFax PRO Send dialog appears.
- Enter the FAX recipients' names and FAX numbers.
You can also select them from Microsoft Outlook/Exchange, or from your personal
phone book.
- Click Microsoft Outlook/Exchange or Phonebook
(in the upper right of the dialog) to open it.
- If you are using Outlook/Exchange,
expand the window. You will see the Address Book, and, under that, Contacts
containing the contacts you have entered.
Note:
For the FAX number to be available to WinFax, it must be set up in Outlook as
Other Fax Number. You may wish to edit your Contact entries if you do
not have FAX numbers in the correct field for WinFax use.
- Locate the name of the FAX recipient(s).
- Double click on the name. WinFax puts the name
and number in the recipient fields.
- Change any options as needed using the menu
bar at the top of the box. (You have probably set many of these options already.)
- Click Send. WinFax displays a cover page
filler.
- Complete the cover page filler, or click Send
to bypass the cover page. WinFax sends your fax.
For more information on
WinFax cover pages, click Help on the WinFax dialog box.
- To see a log of your fax, go to the Message
Manager and select the Send Log icon (on the left).
- If your FAX was transmitted successfully, you
will see a log in the window.
- If your FAX remains in the Outbox, WinFax was
not able to send it successfully. In this case, check your recipient information
and your options settings. If you cannot determine the source of the problem,
speak to your site's information systems personnel.
When you fax (or print) a purchase order, the way the PO lines are ordered depends on whether the PO is bill only, or non-bill-only, and whether any of the lines are receiptless. Here is a summary:
- Non-bill-only purchase order, non-file and file lines, receipts required and receiptless: lines print in line-number order.
- Bill-only purchase order, non-file and file lines, receipts required and receiptless: lines are grouped by receipt required and receiptless. Within each group, the lines are printed in line-number order.
About WinFax PRO
WinFax PRO is a Symantec product (http://www.symantec.com). The package is available from various online software retailers. The current version
is Version 10.0.
The product runs
under Windows ME, Windows 2000, Windows XP, and Windows NT.
Memory requirements
are:
- 32 MB RAM for Windows 98, and Me (64MB recommended)
- 64 MB RAM for Windows NT 4.0 Workstation, 2000, and XP Professional (128MB recommended).
Hard disk requirements are:
- 70 MB hard disk space for Windows 2000 and NT
- 1.5 GB hard disk space for Windows 98, Me, and XP Professional for the full install.
Symantec WinFax Starter Edition is included with
Outlook 98, and Outlook 2000. WinFax Starter Edition is a "light"
version of the product. You have automatic access to WinFax SE when you install
Microsoft Outlook 2000 in Internet Mail Only (IMO) mode. The WinFax Starter
Edition Setup Wizard runs automatically to configure your modem.
Symantec offers an upgrade from the Starter Edition
to the full WinFax PRO 10.0 product.
WinFax PRO supports multiple address books, and it can automatically link to
Microsoft Outlook, making all the address book entries immediately available.
Users can use their Contacts phone numbers to send the Purchase Orders to the
numbers that they have stored for all their vendors. WinFax Pro also supports sharing of faxes in a
network.
After upgrading to WinFax PRO, if you are using
Outlook 98 in IMO mode, WinFax PRO can use the Outlook 98 Contact list (as long
as you are not sharing it across a network.) The FAX number for each list member
must be in the Other fax field and voice number in the Primary Phone
field. You can manually copy the FAX number to the Other fax field,
or use a utility to move the number(s) to the appropriate field(s).
Note that the utility moves, not copies, the numbers. If you have
the Outlook 98 CD, you'll find this utility in the \Valupack\Winfax folder.
Important:
The WinFax Starter Edition is not supported in Outlook 2003 IMO mode and will
be uninstalled by the Outlook upgrade routine, if you are upgrading Outlook
2000 to Outlook 2003. Outlook 2003 does not contain any integrated Fax
program.
Re-Faxing a Purchase Order
Purchase orders that have been faxed and not acknowledged can be re-faxed. Figure 8 is an example: the PO has a PO Comm Type of Fax and the Communication Status is Sent (not Acknowledged). This PO can be re-faxed if needed.
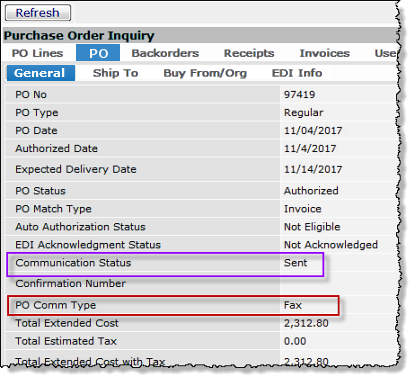
Figure 8 - PO Inquiry for a Faxed PO
To re-fax a PO:
- From the Materials Management main Contents, select Purchasing > Purchase Orders.
The list of purchase orders appears.
- Locate the PO of interest on the list.
- Click Menu > Send/Resend EDI/Fax PO's.
A confirmation panel appears.
- Click Submit to re-fax the PO.
(Clicking Cancel cancels the re-fax.)
When you re-fax a purchase order, the FAX cover sheet displays the message: "RE-FAXED PURCHASE ORDER - DO NOT DUPLICATE."
The Purchase Orders list includes the Re-Faxed column which indicates whether the PO has been re-faxed. (Figure 9). The total number of times the purchase order has been faxed is in parentheses.
This field is empty when a PO has been faxed only initially (i.e., never re-faxed), or not faxed at all.
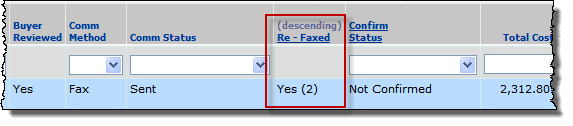
Figure 9 - Re-Faxed Column on the Purchase Orders List
The Faxed Outbound Log displays the column Re Fax (Figure 10). This column contains Yes if the purchase order has been faxed more than once

Figure 10 - Re Fax Column on the Outbound Log
To access the Faxed Outbound Log for a purchase order:
- From the Materials Management main Contents, select Purchasing > Purchase Orders.
The list of purchase orders appears.
- Locate the PO of interest on the list.
- Click Menu > View Faxes.
Faxes for the purchase order appear on a list. Each element in the list is an instance of faxing/re-faxing the PO.
Copyright © 2023 by Premier Inc. All rights reserved.