|
Release 7.14, June 2022 PremierConnect® Supply Chain ERP & Sourcing and Contract Management |
||||||||||||||||
New Features and Enhancements - Release 7.14A summary of enhancements made in updates since Release 7.13 is also included in this document. Browsers: The Google Chrome™ and Microsoft Edge® browsers are now functional for both ERP and SCM.Sourcing and Contract Management (SCM)
ERP Materials Management and Financials
Chrome and Edge NotesSourcing and Contract Management (SCM)
|
| Minority Vendor | Preferred Status |
| Minority Vendor Certified | Female Owned |
| Minority Vendor Certified Number | Locally Owned |
| Asian-Indian | Small Business |
| Asian-Pacific | In Compliance |
| Black | Veteran |
| Hispanic | Veteran - Service Disabled |
| Native American | LGBTQ |
- For ERP/SCM Customers, the data within these fields is populated from the ERP's Vendor data.
- For customers without Premier's ERP, these fields will still appear on the report, but will be blank.
ERP Materials Management and Financials
 Members want to add vendors to ERP using either the import method, or manually,
without having to set the system for one or the other.
A new feature field Vendor Maintenance Mode is available for this purpose.
The field is located on the System Values Other tab, as follows: Administration > System Values > edit > Other
Figure 3 displays the new field and the options.
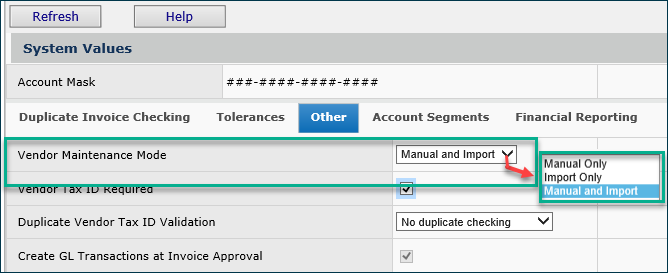
Vendor Maintenance Mode: Select Method of Adding New Vendors
The field Vendor Maintenance Mode provides the following settings for vendor imports:
- To always only enter new vendor records manually: select Manual Only.
- To always use the vendor import only for new vendors: select Import Only.
-
To use either the import or manual entry, as you choose, at any time: select Manual and Import.
- Click the down arrow and select an option.
- Click Submit.
The Excel Add-In Host Setup panel options have changed for several add-in features.
For ERP users logging into the application from an Excel Add-In, a new Host Setup panel is available to make the process easier.
The new Sign On – Host Setup panel has two options: Premier/SSO and Aperek.
- Premier/SSO is for users who access ERP/SCM via Premier Connect as single sign-on (SSO) users.
- Aperek is for users who access ERP/SCM directly via the ERP application URL for their site.
This enhancement is currently in effect for these features:
- Journal voucher import add-in
- ProSheet
- Item maintenance upload/download add-in
- In SCM, Excel contract import
- Click Host Setup to identify the host location (Premier/SSO or Aperek) that you are accessing.
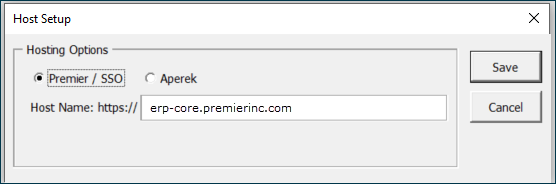
Below is an example of the old panel (Figure 5) for host setup, and the new panel (Figure 6). On the new panel, Aperek is the default.
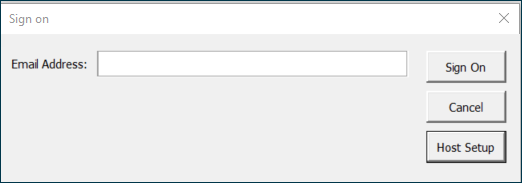
The first time you sign on to the Excel Add-In, you will need to select a host (Figure 4). This step has not changed.
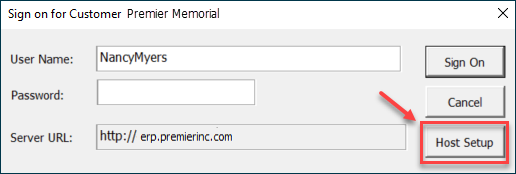
The Sign On Panel for an Excel Add-In Feature
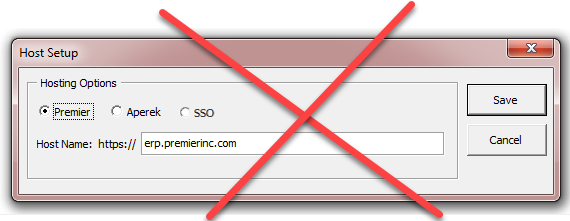
Old Host Setup Panel for Excel Add-Ins
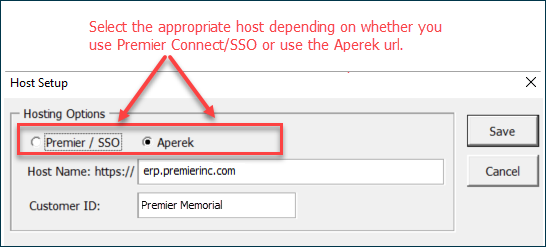
New Host Setup Panel for Excel Add-Ins
Here is a summary of how to sign on to an Excel Add-In once you have installed it.
- On the Excel spreadsheet, click the Premier tab (Figure 7)
A banner appears. One of the banner elements is a sign-on icon.

The Premier Tab and Add-In Sign On in Excel
- Click the sign-on icon. The exact location of the icon on the panel may differ slightly among the add-ins. The sign-on panel appears (Figure 4).
If you have not identified a host for accessing ERP/SCM, click Host Setup (Figure 4). - The Host Setup panel appears (Figure 6). Select either Premier/SSO or Aperek.
- The default is the last option selected.
- When you select Premier/SSO, the panel changes to resemble Figure 8.
Host Panel for SSO
- Click Save. The sign on panel appears again.
Signing on with the "Aperek" host option
- Enter your User Name (if not already entered) and password.
- Click Sign On.
Signing on with the Premier/SSO option
- Enter your email address/User Name (Figure 9).
- Click Sign On.
Excel Add-In SSO User Sign On
Your site's network/application login panel appears. Your site administrator can set you up with the correct URL and other parameters.
- Enter your normal login credentials, and sign on.
Then, the sign on proceeds as follows;
- The Excel Add-In directs control to the Premier Connect page.
- The Premier Connect page looks at the email address and decides if you are an SSO user or not.
- In case of incorrect credentials, the user will get invalid login message.
- Otherwise, the Sign On panel disappears and you are signed on.
Complete instructions for downloading and installing the Excel Add-Ins are in the online documentation.
ERP Problem Resolutions
- The system was creating duplicate AP liability "approval type" transactions for multiple invoices.
The GL transactions created were therefore out of balance.
This problem prevented users from loading their GL transactions into their external GL system.
Analysis revealed that the problem occurred when a PO was a zero cost/zero quantity blanket PO, and receiptless (ReceiptsReqYN = 0).
The created invoice had only a dollar limit exception that, when cleared, generated the error.
This problem is resolved so that only one "Approve Invoice" AP liability transaction will exist for any respective blanket PO invoice,
so that there are no out-of-balance GL transactions and users can successfully import AP GL transactions into their GL system.
- In Chrome, the Punch-out Registrations by Customer panel is not displaying columns, but instead displays all the records in a big paragraph.
This problem has been resolved so that the display is correct and legible.
Chrome and Edge Notes
Chrome and Edge users of ERP and SCM: How to find the role object (security object) that controls access to a feature.
From the main Contents, for ERP or SCM, mouse over a menu element and right click. The role object appears. Next to the role object is the setting for your User Profile (Figure 10 and Figure 11).
The role object setting contains your level of permission to use the feature: None, View, Modify, Create, or All. If you need access and do not currently have access, contact your System Administrator.
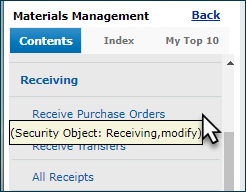
Finding the Security Object for a System Feature - ERP
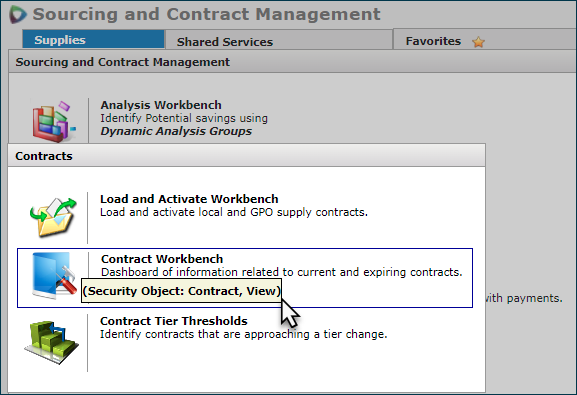
Finding the Security Object for a System Feature - SCM
Enhancements and Problem Fixes from Updates
Update 7.13.1
ERP Enhancements
- The new supplier demographic fields for vendors have been added to the following report objects:
VendorStatistics and Invoice PO Detail.
Both a selection field (Y/N) and the description field are added for each.
This change will assist members who must report to the government the amount spent per diversity from suppliers.
Here is the complete list including the added fields:
Minority Vendor
Native American
Minority Vendor Certified
Female Owned
Minority Vendor Certified Number
Locally Owned
Asian-Indian
Small Business
Asian-Pacific
In Compliance
Black
Veteran
Hispanic
Veteran - Service Disabled
Preferred Status
LGBTQ
ERP Problem Resolutions
- Performance has been improved when opening the AP Invoices list.
The list now opens in five seconds or less. This list is located as follows: Accounts Payable > Invoicing > Invoices.
- The "My Top 10" tab was not showing user's top 10 pages. This problem is resolved so that users can see their top 10 pages again.
- Adding PO lines to bill-only purchase orders was not working correctly: users could not add lines.
Users need to update and create new PO Lines for unauthorized POs so that the POs can be completed.
With lines added to bill-only POs, the system generated an internal error (which users could not see).
The new PO line and the related requisition line were visible, and appeared to be added, but actually had been removed by the system.
This problem has been resolved and this feature now works as designed.
New PO lines can be created, and existing lines can be edited on an unauthorized bill-only PO as follows:
- On the vendor buy-from location record, a minimum order amount must be entered (Figure 12).
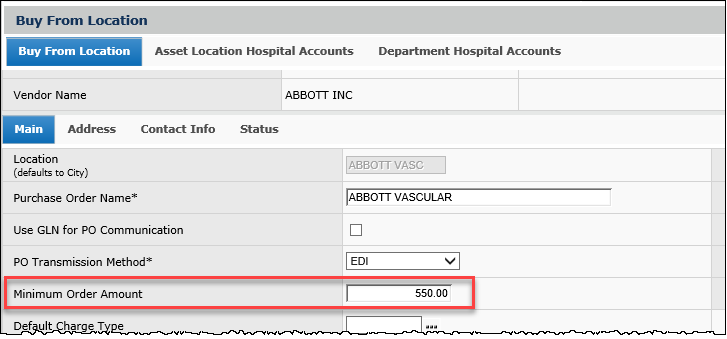
Vendor Buy-From Location Main Tab
(Materials main Contents > Vendors > locate vendor > Menu > Buy From Locations > edit)
- If the total amount of the requisition lines for the vendor buy-from location is less than the Minimum Order Amount, the associated PO line can be created. Saving the bill-only PO closes the edit page and adds the PO line.
- When an existing PO line is edited and the changes saved, the PO line is successfully updated.
- The Payment Profile value did not appear on the Payment Run panel when using Edge. However, it did appear with IE.
Users need to see the Payment Profile on a Payment Run record to know what profile they are working with. This problem has been resolved so that the Payment Profile appears on Edge, Chrome, and IE when creating a new payment record.
- When adding lines to Quick Issues, the cursor was landing in the Position to: field.
On the Quick Issue form when clicking Enter adding lines, the cursor focus was moving to the Position to ... field instead of to the Item Number. This was causing extra clicks for users and a loss of productivity. This problem has been resolved so that this feature works as designed: Clicking Enter after populating required fields for a new Inventory Quick Issue line moves the cursor focus back
to Item Number so users can quickly create the next issue line.
- Under certain conditions, ERP was switching off the Receipts Required flag for bill-only requisition lines and causing
the PO Line to also have Receipts Required flag turned off.
Users creating bill-only purchase orders with Receipts Required noticed that when the PO was generated from the requisition,
the flag was not turned on. The problem occurred when a change was made directly on the Requisition line (not within the Edit Screen). Note that there is a separate Receipts Required flag for file items and non-file items. This issue was affecting both. Also, the authority "Allow Add/Update of Bill Only Reqs and POs" must be enabled on the User Profile for the person doing the work.
This problem has been resolved. The setting of Receipts Required that the user selected on the bill-only requisition now
correctly persists on the associated purchase order.SCM Problem Resolutions
- Cleared contract price exceptions returned as "uncleared" after a few days.
This problem was traced to a deletion of a price record and has been resolved. This situation should no longer occur.
Update 7.13.2
ERP Problem Resolutions
- Several problems with 1099-MISC processing were fixed in this update.
- When users tried to open documents (attached to POs) with a comma in the document filename, an error message appeared.
This error was occurring in Chrome and MS Edge (but not in Internet Explorer).
The problem is resolved so that these documents open as designed, without error.
- In matching a PO and receipts, users had to delete and re-create the invoice several times.
As a result, the invoice details on PO lines were not updated correctly. An invoice was created and deleted;
then a new invoice was created and deleted. At this point, the PO line quantities were incorrect.
Also, the invoice match status was "part matched," also incorrect.
This problem has been resolved. In situations where invoice matching requires deleting multiple created invoices for the match,
the PO line quantities will be correct (as originally specified in the PO) and the invoice match status will remain as "unmatched."Update 7.13.3
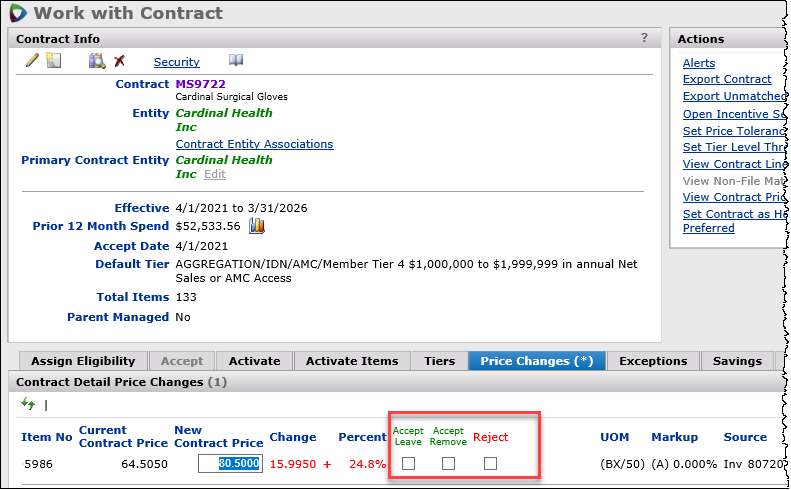
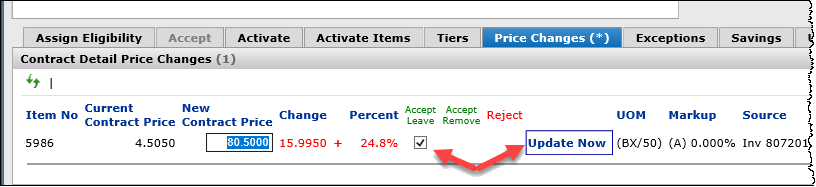
- SCM Vizient clients: On the Price Changes panel for Vizient contracts, the Accept Leave option has been restored.
See Figure 13 and Figure 14 below. The Accept Leave field, when checked, accepts the price change and leaves the
item on contract. The tool tip no longer appears when you mouse over the Accept Leave field.
Accept Leave Option Restored for Vizient
Accept Leave Selected for Vizient Contract
ERP Problem Resolutions
- When users attempted to merge vendors, the process was unexpectedly terminating with errors in the AP location
and item usage tables.
This problem has been resolved so that the application successfully merges the buy-from location and AP location without any issues.Update 7.13.4
ERP Problem Resolutions
- Unposted transactions on the invoice distribution lines were being included in ISR 1099 form totals, which is incorrect.
When the system was calculating the total amount for a 1099 for a vendor, the total included unposted adjustment transactions
that were on paid-in-full invoices. This problem has been resolved so that only posted transactions are included in the 1099 totals
and the totals are then correct.
- Tax ID information containing non-numeric characters could not be imported from the vendor import template.
The TaxID field on the import did not accept non-numeric characters. This problem has been resolved: on the vendor import template,
you can use numeric and non-numeric values in the TaxID column.
- When nine characters are entered, the TaxID value imports to the vendor record as is.
- When the TaxID is zero, it is imported to the vendor record as "blank."
- When the TaxID has nine characters that include one or more leading zeros, the zeros are retained on import.
- When the value for the TaxID is not zero, and has has less than 9 characters, the application returns an error.ERP Problem Resolutions
Zero-cost items on a PO were being received at an unknown cost.
When multiple lines were received, and included lines with zero-cost items, the zero-cost items picked up the unit price of the prior costed line.
This problem has been resolved as follows:
- Given that a PO with multiple lines has one line with a unit cost, while the unit costs of the other lines are zeroed out: when the order is processed, the zero-cost lines stay zero.
- When a PO with multiple lines is processed without changing the unit cost, the invoice and receipt line match, as normal.
- When multiple attachments exist for emails, the count in the Documents link under Attachments (Correspondence tab) was not accurate.
Figure 15 illustrates the problem. The example is from SCM Projects, but the problem occurs in other areas with included emails as well.
Incorrect Count for Multiple Attached Documents on the Correspondence Tab
This problem has been resolved so that the Attachments list displays the correct count of actual documents.